One is to locate it directly under one of the joists. Required fields are marked *. (these are all things were fixing as part of our renovation plans, which you can read more about here). Trust me, the finished molding you install over the door on top of the drywall will cover even a one-inch gap between the top of the door jamb and the bottom of the rough opening. Snap another chalk line between these points. John Kelly Continue building the wall in place [source: rona.ca]. (May 4, 2012) http://www.soundproofing101.com/soundproofing_3.htm, Special Offer on Antivirus Software From HowStuffWorks and TotalAV Security. This really depends on your homes foundation and what type of floor youre building the interior wall upon. Your home will also have its own ideas. How To Build A Wall A Basic Guide To Building An Interior Wall. Continue in this fashion down the rest of the wall. Next, apply more beads of caulk to the surface of plasterboard, tracing the lines of the plates and studs. Drill angled pilot holes in the ends of the wall studs for the nails. Where the wall will be located sounds simple enough, but in reality, it can get pretty complicated. How to Tape the Ceiling and Walls for Drywalling, How to Cut Out Around a Doorway When Installing Drywall, Family Handyman: How to Hang Drywall Like a Pro. This will be the top edge of the new wall. A typical interior wall has a skeleton of vertical 2-by-4 studs that stand between horizontal 2-by-4 base and top plates.
The Best Paints for Interior Walls to Give Any Room a Makeover, How to Build a Temporary Wall Inside Your Home, How to Replace a Load-Bearing Wall With a Support Beam, How to Reinforce a Wall Stud by Sistering, How to Troubleshoot and Repair a Leaking Ceiling. Measure the height of the room, and then subtract the combined thickness of the two plates. An interior wall is typically built from 2-by-4 or 2-by-6 wall studs and framing, covered with panels of gypsum drywall that are nailed or screwed to the framing members. Maybe you want to turn part of a room into a home office. Mark with an X so you know that is exactly where the stud is supposed to go. Whatever that measurement is be sure to take out 3 total to account for the top plate and base plate otherwise your studs will be too long. Lift each stud into position and line it up to its mark. Tap a nail into each of these lines. To make the U, lay one 24 flat on its 3.5 face. If your room isnt square, youll need to account for that in your design. But we hope you decide to come check us out. In fact, we love fixing weird homes! Begin by driving the nail in straight until it grabs the stud, then angle it upwards to about 60 degrees and drive it all the way in. Your email address will not be published. If the plasterboard has been removed, use a level to find out if the existing walls, floor and ceiling are square. You may discover the carpenters who built your home didnt go to the trouble to stack all their framing. This will be the width of your rough opening. Want more? Building a wall in place usually makes sense when the ceiling you're working with is covered with plasterboard.
Snap a chalk line along the floor between the marks as a guide for the bottom plates edge. Then, nail down the plate with 3-inch nails. Pamblanco Painting recommends sanding the wall, vacuuming up all the dust and rubbing it down with a black cloth. Beginners can lay a mosaic tile floor as a DIY project, just start off small. Where one wall intersects another, double up studs to receive the intersecting wall. "And they provide a place to attach your plasterboard.". If this looks like the work will be beyond your skills or if you dont have the necessary tools, hire a framing contractor or carpenter to do the work. Number each stud and plate position (1,2,3, etc.) Once you've done a little planning, you're ready to assemble your wall. Then make a second mark on the floor adding a 1/2 inch to account for drywall. She holds a Master of Science in Publishing from Pace University. If one meets a wall, you need to measure 15 1/4 inches to find the first stud and 16 inches for each subsequent stud. This will determine the length of your studs. To complete the wall, drywall will be hung on the studs. To start, mark out the new walls center line across your ceiling. Even with a non-load-bearing wall, many municipalities require you to apply for a building permit before executing the project.
Snap a chalk line for a guide for your bottom plates edge.
Take the time to look at the new room you are creating and make sure the space is going to work for you. Regardless of what your DIY heart desires, all of these projects require the same thing: a new wall. Im planning to use a contractor but wanted to know more about building. As you tilt the wall up, it binds against the ceiling. For wood floor systems, attach the bottom plate to the floor with a hammer and nails. After that skeleton is up, the second half of this project begins: hanging the drywall. Or you might be dreaming of a walk-in closet or a pantry for your kitchen. One method that has often saved my bacon is to use a cordless drill driver and screws for framing instead of a hammer and nails. No more vacant rooftops and lifeless lounges not here in Capitol Hill. Interior walls are usually made from 2x4 boards or 2x6 wall studs and framing. Once your base plate is secured, use a level and a hammer to move the top plate into level position. By clicking Accept All Cookies, you agree to the storing of cookies on your device to enhance site navigation, analyze site usage, and assist in our marketing efforts. handymantips basement beautyesthetichair diyoaklynmagazine thewhitestyle Once the wall is vertical, you can then slide it into position under the floor joists, assuming you didnt make the wall too tall. Now that youve got your plan on paper and your chalk lines marked, it is time to set it in motion and get to actually building that wall! So this teen designed and built one. Every now and then its interesting to go back in time. 16 inches on center means the center of your vertical studs are spaced out by 16 inches. First thing to do is grab a tape measure, pencil, ruler, graph paper, a 4 foot level, a chalk reel, and a friend. 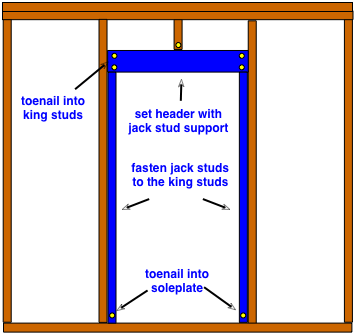
Use the laser level plumb function to ensure that the top plate is directly above the bottom plate. steps remove You will need to frame in new 24s to span the gap between the joists/rafters so you can attach your wall to them.
Your wall will not be much thicker, but this setup will dampen sound better than an ordinary wall [source: soundproofing101.com]. Then you'll apply plaster-like joint compound and paper tape to each joint and corner. Use screws to attach it.
Working with an older house always presents challenges. "How to Frame a Partition Wall," This Old House Magazine. With this project, though, two full sheets of drywall are used, rendering it unnecessary to break the ends. Your wall is up and ready for finishing. At Making Manzanita, you'll find step-by-step home improvement tutorials and design inspiration. This project requires considerable planning and skill, but it is not as complicated as you might think. UPDATE: You definitely want to read this post on framing a door in your wall if you have a door you need to add! Self-starting screws are easy to put in place and hold tightly.
Ive experienced your anxiety. Line it up with the lines you made on floor and ceiling.
After you finish the framing, refer to the links above right for the techniques used for cutting and attaching drywall or paneling. Making Manzanita has participated in One Room Challenge and was a finalist in the Fall 2019 Jeffrey Court Renovation Challenge. Perhaps youre trying to create a new small space for a home office or hobby room, or maybe you have a bigger appetite and are transforming a dank basement into a finished living space. Keep in mind that your finished wall will be 4.5 wide (3.5 of studs and two sheets of .5 drywall on either side). You want your marks to be seen on the top and side of the plates so you can easily see them when you put in your 24 studs. Get daily tips and tricks for making your best home. Kelly Bacon is a licensed general contractor with over 40 years of experience in construction, home building and remodeling, and commercial building. If you are keeping your current flooring, then just take out the 4.5 inches of flooring necessary for the wall to sit in. Next measure your room and draw it out onto graph paper. Next up if you learning how to build a wall, you need to know how to frame a door. Voila: where you had one room, now you have two. Begin with one stud at the end. Building a new interior wall in an existing house can be much different from doing it on a new home job site. Plan for one stud at both ends.
Install the bottom plate. Measure the distance between the two plates. You can do this by measuring the joist locations in your basement or crawl space and then transferring the measurements to the floor inside. This has been an excellent learning experience because the information was so well presented from words through pictures. Whichever method you've used to put the wall up, it's time for finishing. Go back to your top and base plates and make a mark 3/4 on either side of each 16 mark. Why not split it into a small guest room and a home theater where you can kick back and watch a movie? If the new wall wont butt into studs at the connecting wall or fall directly beneath a ceiling joist, you must install nailing blocks between the framing pieces. Next its time to put the wall together. Use a short scrap piece of two-by-four to mark a stud position at each end. Once the top plate is installed, hang a plumb bob from each of the top plates ends from the ceiling to just above your floor. First, insert the studs at either end of the new wall.
Start with the top and bottom plates. Using a combination square, mark perpendicular lines across each.
The first thing youll need to do when you are building an interior wall is: You will apply this same technique when attaching your wall to existing walls.
Hopefully you learned a lot as we showed you how to build a wall with 24 studs. The bottom 8-foot-long two-by-four must be fastened to a solid spot on the floor. HomeTips articles may contain links to Amazon.com and other partner programs that provide helpful products and services. This will secure your stud into the concrete. The area is shown above. This method of adding an interior wall also makes it easier to adapt to existing walls, floors and ceilings that aren't quite square.  In fact, there may be no stud available at the point where you want to add your new wall. This alignment allows plumbers and HVAC contractors to route their pipes and ducts with ease. So grab those 24 studs and lets chat about how to build a wall! If you follow these steps carefully, you should have little trouble with the project. If the wall will turn a corner, frame it with two full-length studs that have blocks sandwiched in between.5. Start by separating the top plate and base plate on the ground so you can fit the studs in between them. See photo below for an example of a channel. How to Install Tempered Hardboard Panels to Walls, How to Use Foam Core Molding to Make Wall Panels. Start by measuring if your room is square where you are adding the wall. Next, you will attach the top plate to the ceiling, directly above the bottom plate.
"How to Soundproof a Wall." Let it dry, then paint the wall the color of your choice. Use no less than 3-inch-long 16d sinker nails to connect the wall studs to the plates. 
