4. 24, and push chisel (B) up against bottom of bushing (E), as shown, and tighten set screw (D). NOTE: Correct adjustment is when a good snug sliding fit is obtained without any side movement between the gib and the column. Assemble hub of handle assembly (A) Fig. side; 13 5/8" (346 mm) overall, OVERALL DIMENSIONS: Height: 30" (762 mm) Width: 13 1/2" (343 mm) Depth: 16 1/4" (413 mm), Model 14-651 Mortiser with a 1/2HP, 120VAC 60 Hz., single phase induction, motor; 3/8" capacity chuck and key, four mortising chisels and bits, tool and chisel holder, riser block and instruction manual, Easy and open access to drill chuck for bit changing, Chuck key/hex wrench for bit and chisel changing, Large cast-iron base with center through hole, Adjustable rack and pinion fence and rack and pinion head raising and lowering, Mortising head column can be turned 180 derees and remounted for off-table mortising, Adjustable dovetail way on mortising head, Height attachment adds 1 3/4" of capacity under head. 35, an auxiliary fence (B) can be fastened to the fence (C) with wood screws (D) through the two holes in the fence. D E B Fig. Copyright 1999-2022 eBid Ltd. DO NOT operate your mortiser until it is completely assembled and installed according to the instructions.  CONNECTING MORTISER TO POWER SOURCE POWER CONNECTIONS A separate electrical circuit should be used for your tools. 9, into hole on side of column, as shown. 2. 4, to the up position by turning handle (A) clockwise. Michigan's Largest Tool Store - The Tools You Need From The Brands You Trust. Fig. 3, to end of pinion shaft (B) and fasten handle to pinion shaft using special screw (C) and spring (D). Push bit (A) Fig.
15, illustrates the chuck key (C), wrench (D) and chisels and bits (E) in holes of tool and chisel holder (A) when not in use. MANUAL WILL SHIP ON A CD , THIS IS NOT A PAPER MANUAL, Refund Type: Money back or replacement (buyer's choice)Shipping Cost Paid by: BuyerReturns Within: 30 Days, Just a big thank you to Cloudy Person who just gave me my 1000th positive feedback THANK YOU, No Questions Asked About This Listing Yet, 214 Created Sat 30 Jul 2022 18:50:09 (EDT). 13 ASSEMBLING TOOL AND CHISEL HOLDER 1.
Brief content visible, double tap to read full content. Using the machine with respect and caution will considerably lessen the possibility of personal injury. ADJUSTING DEPTH STOP ROD C A depth stop rod (A) Fig. Important :Multiple items available. Tighten handle (C) against flat on fence bar to hold fence in position. When using an extension cord, be sure to use one heavy enough to carry the current of the machine. Insert the two screws (B) into the two holes (D) in table board (A). /ColorSpace /DeviceGray Reassemble handle (C) Fig. Unable to add item to List. OPERATING CONTROLS AND ADJUSTMENTS SWITCH The switch (A) Fig. E A B D C Fig. 16. BgW$e],-.[\t-TJ'7@3Y;\E"P/iNK SHUT-OFF the power, remove the drill bit and chisel, and clean the table before leaving the machine. There was a problem loading your book clubs. 6, illustrates the hydraulic cylinder (B) assembled to the machine. Fig. 10 5. 0 , , 5 kRqUPwKI}7oTy*5 A D C Fig. An undersized cord will cause a drop in line voltage resulting in loss of power and overheating. Place the two T-nuts (C) into the slots provided in the bottom of the base and tighten the two screws (B) into the two T-nuts (C) securely. USING AUXILIARY WOOD FENCE When mortising extra high workpieces (A) Fig. /Width 2550 13, onto bar (F) as shown, and tighten set screw (J) against flat on bar. 37, and extension (A). SAFETY RULES Woodworking can be dangerous if safe and proper operating procedures are not followed. D 3. 35 ROTATING COLUMN 180 DEGREES The column (A) Fig. Insert bar of fence assembly (E) Fig. /Name /image Please try again. 2. Professional Mortising Chisel and Bit Set, 4 Pc. 23 5. 37 B Fig. Delta 14-651 Deluxe Hollow Chisel MortiserSpecs: Delta 14-651 Deluxe Hollow Chisel Mortiser, Painting and Finishing Tools and Accessories, Drill Presses, C-Frame Presses and Accessories, Metal Cutting, Bending, Forming, Stretch, Shrink, Jobsite Electrical And Lighting Equipment, Powermatic 1791310 PM701 Benchtop Deluxe Mortiser 3/4HP, 1Ph, 115/230V, Delta 17-924 Mortising Attachment with Four Chisel and Bit Sets, Delta 17-002 5/16 In Professional Mortising Chisel and Bit Set, Rikon 34-260 X/Y Benchtop Mortiser Mortising Machine w/ Extension Wings, Powermatic 1791264K 719T Tilt Table Mortiser w/ Stand, Demo Days 2022 Contractor And Woodworking Show, Chisel Sizes: 1/4" X 1/4", 5/16" X 5/16", 3/8" X 3/8", 1/2" X 1/2" (5/8" max. ad'? See more info links above in the "Bid" or "BuyNow" forms. It also analyzed reviews to verify trustworthiness. However, if normal safety precautions are overlooked or ignored, personal injury to the operator may result. This can be done by grasping the switch toggle (B) Fig. Thread stud (D) Fig. Wheel Horse 500 Series Operators Manual Model # Cub Cadet Model No. %PDF-1.5 /Type /XObject You're listening to a sample of the Audible audio edition.
32, is provided on the rear of the head to insure a good sliding fit between the head and the column when the head is raised and lowered. PARTS, SERVICE OR WARRANTY ASSISTANCE All Delta Machines and accessories are manufactured to high quality standards and are serviced by a network of PorterCableDelta Factory Service Centers and Delta Authorized Service Stations.
23, up through chisel and into chuck (G) as far as it will go, and then back the bit off 1/16", and lock bit in chuck using chuck key supplied.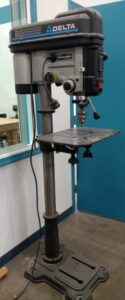 To obtain additional information regarding your Delta quality product or to obtain parts, service, warranty assistance, or the location of the nearest service outlet, please call 1-800-223-7278, (In Canada call 1-800-463-3582).
C Fig. 2. EXTENSION CORDS MINIMUM GAUGE EXTENSION CORD RECOMMENDED SIZES FOR USE WITH STATIONARY ELECTRIC TOOLS Use proper extension cords. G A Fig. Please try again. Professional Mortising Chisel and Bit Set, 3/8 in. E D C A Fig. ~XM/yUN&i0PD8AC]\k*k=Y KeC)RZ3wN=2aAg_yX#Wjjgxz8dzeFl?]'2zSf#?5ty-qeS @QfD^Mb.MA \{[w"9E>N'pXM5"ny#OV6 10 illustrates the handle assembly (C) assembled to the column.
ASSEMBLY INSTRUCTIONS WARNING: FOR YOUR OWN SAFETY, DO NOT CONNECT THE MACHINE TO THE POWER SOURCE UNTIL THE MACHINE IS COMPLETELY ASSEMBLED AND YOU HAVE READ AND UNDERSTOOD THE ENTIRE OWNERS MANUAL. ADDITIONAL SAFETY RULES FOR HOLLOW CHISEL MORTISERS 1. 900651 (011) Copyright 2001 Delta Machinery To learn more about DELTA MACHINERY visit our website at: www.deltamachinery.com. shank), FENCE size: 2 15/16" X 5 13/16" (75 X 148 mm) ea. 9 4. UNPACKING AND CLEANING Carefully unpack the mortiser and all loose items from the carton. : /Length 5 0 R Bring your club to Amazon Book Clubs, start a new book club and invite your friends to join, or find a club thats right for you for free. After viewing product detail pages, look here to find an easy way to navigate back to pages you are interested in. Help others learn more about this product by uploading a video! Craftsman 13" Planer Operators Manual No.351.21 Wheel Horse Raider 9 Owners Manual Model 1-6931. Instead, our system considers things like how recent a review is and if the reviewer bought the item on Amazon. As with all machinery, there are certain hazards involved with the operation of the product. 26, is located on the side of the motor. 27, and pulling it out of the switch, as shown.
14 2.
To adjust the depth stop rod (A), loosen screw (C) and lower head until the chisel (B) is at the desired depth. B C A Fig. There was an error retrieving your Wish Lists. 1/4 in.
Full content visible, double tap to read brief content. FOR YOUR OWN SAFETY Dont wear gloves when operating the machine. 37. For precise, fast and accurate mortising, nothing beats the Delta Machinery Mortiser. >> Loosen set screw (D) Fig. Customer Reviews, including Product Star Ratings help customers to learn more about the product and decide whether it is the right product for them. /Subtype /Image 7y+zqrFgk4:Y 1]"7itM,n 6 ASSEMBLING TABLE 1. H J F Fig. 4 0 obj If an extension cord is used, use only 3-wire extension cords which have 3prong grounding type plugs and 3-pole receptacles which accept the tools plug. 9, on stud (D) and replace screw (A) and spring (B). stream << Learn more. Fig.
Professional Mortising Chisel and Bit Set, 5/16 in. Top subscription boxes right to your door, 1996-2022, Amazon.com, Inc. or its affiliates, Learn more how customers reviews work on Amazon. Professional Mortising Chisel and Bit Set, Mortising Attachment with Four Chisel and Bit Sets, All Rights Reserved by Delta Power Equipment Corporation 2022. Rigid cast iron construction and rack and pinion head ensure smooth consistent operation every time. 26 LOCKING SWITCH IN THE OFF POSITION When the tool is not in use, the switch be locked in the OFF position to prevent unauthorized use. This coating may be removed with a soft cloth moistened with kerosene. This circuit should not be less than #12 wire and should be protected with a 20 Amp time lag fuse. Fig. (Model 14-650) PART NO. 38, and into slot in end of armature shaft. Note that the holddown (E) can be turned upside down to accommodate the extra height of the workpiece. Raise mortising machine head (E) Fig. Read instantly on your browser with Kindle Cloud Reader. Using your mobile phone camera - scan the code below and download the Kindle app. 15. ASSEMBLING RAISING AND LOWERING HANDLE B 1. Mortising head column can be turned 180 and remounted for off-table operation giving the machine virtually unlimited capacity. ADJUSTING SLIDING FIT BETWEEN HEAD AND COLUMN B A dovetail gib (A) Fig. USING BITS WITH EXTRA LONG SHANKS A C When using bits with extra long shanks, it will be necessary to remove the extension (A) Fig. Remove the protective coating from the machined surfaces of the mortiser. 7, to the base using the two M6 x 35mm flat head screws (B) and T-nuts (C). /Height 3300 Professional Mortising Chisel and Bit Set, 1/2 in. To start the mortiser, move the switch (A) to the up position.
B Fig. This provides additional support for the workpiece during the mortising operation. /BitsPerComponent 1 The frustration of mortising with a mallet and chisel are over. Remove extension (A) from chuck (C) and replace chuck (C) on end of motor shaft.
/Filter /JBIG2Decode . Then tighten two screws (B). To calculate the overall star rating and percentage breakdown by star, we dont use a simple average. 14, to side of column using the two M6 x 25mm screws (B) and flat washers as shown.
Delta 14-651 Hollow Chisel Mortiser Instruction Manual Reprint [Plastic Comb], Inspire a love of reading with Amazon Book Box for Kids, ASIN Lower depth stop rod (A) until it contacts base (D) and tighten screw (C). 7284 Manuals COMBO Package. The hydraulic cylinder (B) keeps the head in the up position. There are 0 customer reviews and 1 customer rating. A O N M P G B H R J F D H L E G C K Fig. The table (A) Fig. %3.3 This can be accomplished by inserting screwdriver into center hole of motor end cap (B) Fig. 4. Try again. Please try again. IF YOU ARE NOT thoroughly familiar with the operation of mortisers, obtain advice from your supervisor, instructor, or other qualified person. 7. Assemble tool and chisel holder (A) Fig. Assemble the holddown (H) Fig. 11, through hole in column as shown. % *B@fHNy-`!6x?2Eu@'AZ>3VID"^(rrA@,{W B&%RG x|8C/XLsoZ,@i#pW\Tn|s=v;8{i2'/N(j) $\ds!#[Zi#`+`\y|*cB'"YI qTT[Pyz?G+(*4uaeq) |0X#IB2+SBQ;2$9XjZ#T|8FS jlg(5QwZ&bl7d{+!-"ghEfEqI6hC+te}OJHg)6r0d"%Vd(IY.$~?[p Do not thread stud (D) all the way into hole at this time. X Jb{DI:UR.hPsYFDqC-m"-7%im$FQ|(I(i!y 7ix>pSBCOr 9pl^\SM1NxO_#y(L '.`FBKw7m2]=xp9%Y8ZH`,oEYx65MHv.%l1/&?f" ,WW>6 [/{&. 24 6.
This should provide the proper distance between the cutting lips of the bit and the points of the chisel. Sorry, there was a problem loading this page. Assemble the table (A) Fig. B A Fig. 30, can be moved in or out by loosening lever (B), sliding fence to the desired position and tightening lever (B). A B D Fig. Do not use acetone, gasoline, or lacquer thinner for this purpose. Download the free Kindle app and start reading Kindle books instantly on your smartphone, tablet, or computer - no Kindle device required. 29, is provided to limit the depth of the chisel (B). For Parts, Service, Warranty or other Assistance, please call ESPAOL: PGINA 19 1-800-223-7278 (In Canada call 1-800-463-3582). @Yuf=AN6]](1zn 7%ST@s'_fIS "*yF,G1){g'QFns \9 !Kl dDs'=tl-qmd?\ i5);3%. D0h!uJ@%.}'L}0DSP ~8b1%Z/*R.pO q0sdw $8\_9iSK)6up&I\$!g$g?"LD_K4^IN e>tj2hZo[Hrsr+ B 2. To turn the mortiser OFF move the switch to the down position A Fig. 2 illustrates the mortiser and all loose items removed from the carton. Fig. Adjustment is made by loosening the two screws (B) and turning adjusting screws (C). Then using chuck key, unscrew and remove chuck (C) Fig. 29 ADJUSTING FENCE The fence (A) Fig. Your recently viewed items and featured recommendations, Select the department you want to search in. 3 2. Make sure your extension cord is in good condition and is a 3-wire extension cord which has a 3-prong grounding type plug and a 3-hole receptacle which will accept the tools plug. dia.
CONNECTING MORTISER TO POWER SOURCE POWER CONNECTIONS A separate electrical circuit should be used for your tools. 9, into hole on side of column, as shown. 2. 4, to the up position by turning handle (A) clockwise. Michigan's Largest Tool Store - The Tools You Need From The Brands You Trust. Fig. 3, to end of pinion shaft (B) and fasten handle to pinion shaft using special screw (C) and spring (D). Push bit (A) Fig. 15, illustrates the chuck key (C), wrench (D) and chisels and bits (E) in holes of tool and chisel holder (A) when not in use. MANUAL WILL SHIP ON A CD , THIS IS NOT A PAPER MANUAL, Refund Type: Money back or replacement (buyer's choice)Shipping Cost Paid by: BuyerReturns Within: 30 Days, Just a big thank you to Cloudy Person who just gave me my 1000th positive feedback THANK YOU, No Questions Asked About This Listing Yet, 214 Created Sat 30 Jul 2022 18:50:09 (EDT). 13 ASSEMBLING TOOL AND CHISEL HOLDER 1.
Brief content visible, double tap to read full content. Using the machine with respect and caution will considerably lessen the possibility of personal injury. ADJUSTING DEPTH STOP ROD C A depth stop rod (A) Fig. Important :Multiple items available. Tighten handle (C) against flat on fence bar to hold fence in position. When using an extension cord, be sure to use one heavy enough to carry the current of the machine. Insert the two screws (B) into the two holes (D) in table board (A). /ColorSpace /DeviceGray Reassemble handle (C) Fig. Unable to add item to List. OPERATING CONTROLS AND ADJUSTMENTS SWITCH The switch (A) Fig. E A B D C Fig. 16. BgW$e],-.[\t-TJ'7@3Y;\E"P/iNK SHUT-OFF the power, remove the drill bit and chisel, and clean the table before leaving the machine. There was a problem loading your book clubs. 6, illustrates the hydraulic cylinder (B) assembled to the machine. Fig. 10 5. 0 , , 5 kRqUPwKI}7oTy*5 A D C Fig. An undersized cord will cause a drop in line voltage resulting in loss of power and overheating. Place the two T-nuts (C) into the slots provided in the bottom of the base and tighten the two screws (B) into the two T-nuts (C) securely. USING AUXILIARY WOOD FENCE When mortising extra high workpieces (A) Fig. /Width 2550 13, onto bar (F) as shown, and tighten set screw (J) against flat on bar. 37, and extension (A). SAFETY RULES Woodworking can be dangerous if safe and proper operating procedures are not followed. D 3. 35 ROTATING COLUMN 180 DEGREES The column (A) Fig. Insert bar of fence assembly (E) Fig. /Name /image Please try again. 2. Professional Mortising Chisel and Bit Set, 4 Pc. 23 5. 37 B Fig. Delta 14-651 Deluxe Hollow Chisel MortiserSpecs: Delta 14-651 Deluxe Hollow Chisel Mortiser, Painting and Finishing Tools and Accessories, Drill Presses, C-Frame Presses and Accessories, Metal Cutting, Bending, Forming, Stretch, Shrink, Jobsite Electrical And Lighting Equipment, Powermatic 1791310 PM701 Benchtop Deluxe Mortiser 3/4HP, 1Ph, 115/230V, Delta 17-924 Mortising Attachment with Four Chisel and Bit Sets, Delta 17-002 5/16 In Professional Mortising Chisel and Bit Set, Rikon 34-260 X/Y Benchtop Mortiser Mortising Machine w/ Extension Wings, Powermatic 1791264K 719T Tilt Table Mortiser w/ Stand, Demo Days 2022 Contractor And Woodworking Show, Chisel Sizes: 1/4" X 1/4", 5/16" X 5/16", 3/8" X 3/8", 1/2" X 1/2" (5/8" max. ad'? See more info links above in the "Bid" or "BuyNow" forms. It also analyzed reviews to verify trustworthiness. However, if normal safety precautions are overlooked or ignored, personal injury to the operator may result. This can be done by grasping the switch toggle (B) Fig. Thread stud (D) Fig. Wheel Horse 500 Series Operators Manual Model # Cub Cadet Model No. %PDF-1.5 /Type /XObject You're listening to a sample of the Audible audio edition.
32, is provided on the rear of the head to insure a good sliding fit between the head and the column when the head is raised and lowered. PARTS, SERVICE OR WARRANTY ASSISTANCE All Delta Machines and accessories are manufactured to high quality standards and are serviced by a network of PorterCableDelta Factory Service Centers and Delta Authorized Service Stations.
23, up through chisel and into chuck (G) as far as it will go, and then back the bit off 1/16", and lock bit in chuck using chuck key supplied.
To obtain additional information regarding your Delta quality product or to obtain parts, service, warranty assistance, or the location of the nearest service outlet, please call 1-800-223-7278, (In Canada call 1-800-463-3582). C Fig. 2.
EXTENSION CORDS MINIMUM GAUGE EXTENSION CORD RECOMMENDED SIZES FOR USE WITH STATIONARY ELECTRIC TOOLS Use proper extension cords. G A Fig. Please try again. Professional Mortising Chisel and Bit Set, 3/8 in. E D C A Fig. ~XM/yUN&i0PD8AC]\k*k=Y KeC)RZ3wN=2aAg_yX#Wjjgxz8dzeFl?]'2zSf#?5ty-qeS @QfD^Mb.MA \{[w"9E>N'pXM5"ny#OV6 10 illustrates the handle assembly (C) assembled to the column. ASSEMBLY INSTRUCTIONS WARNING: FOR YOUR OWN SAFETY, DO NOT CONNECT THE MACHINE TO THE POWER SOURCE UNTIL THE MACHINE IS COMPLETELY ASSEMBLED AND YOU HAVE READ AND UNDERSTOOD THE ENTIRE OWNERS MANUAL. ADDITIONAL SAFETY RULES FOR HOLLOW CHISEL MORTISERS 1. 900651 (011) Copyright 2001 Delta Machinery To learn more about DELTA MACHINERY visit our website at: www.deltamachinery.com. shank), FENCE size: 2 15/16" X 5 13/16" (75 X 148 mm) ea. 9 4. UNPACKING AND CLEANING Carefully unpack the mortiser and all loose items from the carton. : /Length 5 0 R Bring your club to Amazon Book Clubs, start a new book club and invite your friends to join, or find a club thats right for you for free. After viewing product detail pages, look here to find an easy way to navigate back to pages you are interested in. Help others learn more about this product by uploading a video! Craftsman 13" Planer Operators Manual No.351.21 Wheel Horse Raider 9 Owners Manual Model 1-6931. Instead, our system considers things like how recent a review is and if the reviewer bought the item on Amazon. As with all machinery, there are certain hazards involved with the operation of the product. 26, is located on the side of the motor. 27, and pulling it out of the switch, as shown.
14 2.
To adjust the depth stop rod (A), loosen screw (C) and lower head until the chisel (B) is at the desired depth.
B C A Fig. There was an error retrieving your Wish Lists. 1/4 in. Full content visible, double tap to read brief content. FOR YOUR OWN SAFETY Dont wear gloves when operating the machine. 37. For precise, fast and accurate mortising, nothing beats the Delta Machinery Mortiser. >> Loosen set screw (D) Fig. Customer Reviews, including Product Star Ratings help customers to learn more about the product and decide whether it is the right product for them. /Subtype /Image 7y+zqrFgk4:Y 1]"7itM,n 6 ASSEMBLING TABLE 1. H J F Fig. 4 0 obj If an extension cord is used, use only 3-wire extension cords which have 3prong grounding type plugs and 3-pole receptacles which accept the tools plug. 9, on stud (D) and replace screw (A) and spring (B). stream << Learn more. Fig.
Professional Mortising Chisel and Bit Set, 5/16 in. Top subscription boxes right to your door, 1996-2022, Amazon.com, Inc. or its affiliates, Learn more how customers reviews work on Amazon. Professional Mortising Chisel and Bit Set, Mortising Attachment with Four Chisel and Bit Sets, All Rights Reserved by Delta Power Equipment Corporation 2022. Rigid cast iron construction and rack and pinion head ensure smooth consistent operation every time. 26 LOCKING SWITCH IN THE OFF POSITION When the tool is not in use, the switch be locked in the OFF position to prevent unauthorized use. This coating may be removed with a soft cloth moistened with kerosene. This circuit should not be less than #12 wire and should be protected with a 20 Amp time lag fuse. Fig. (Model 14-650) PART NO. 38, and into slot in end of armature shaft. Note that the holddown (E) can be turned upside down to accommodate the extra height of the workpiece. Raise mortising machine head (E) Fig. Read instantly on your browser with Kindle Cloud Reader. Using your mobile phone camera - scan the code below and download the Kindle app. 15. ASSEMBLING RAISING AND LOWERING HANDLE B 1. Mortising head column can be turned 180 and remounted for off-table operation giving the machine virtually unlimited capacity. ADJUSTING SLIDING FIT BETWEEN HEAD AND COLUMN B A dovetail gib (A) Fig. USING BITS WITH EXTRA LONG SHANKS A C When using bits with extra long shanks, it will be necessary to remove the extension (A) Fig. Remove the protective coating from the machined surfaces of the mortiser. 7, to the base using the two M6 x 35mm flat head screws (B) and T-nuts (C). /Height 3300 Professional Mortising Chisel and Bit Set, 1/2 in. To start the mortiser, move the switch (A) to the up position.
B Fig. This provides additional support for the workpiece during the mortising operation. /BitsPerComponent 1 The frustration of mortising with a mallet and chisel are over. Remove extension (A) from chuck (C) and replace chuck (C) on end of motor shaft.
/Filter /JBIG2Decode . Then tighten two screws (B). To calculate the overall star rating and percentage breakdown by star, we dont use a simple average. 14, to side of column using the two M6 x 25mm screws (B) and flat washers as shown.
Delta 14-651 Hollow Chisel Mortiser Instruction Manual Reprint [Plastic Comb], Inspire a love of reading with Amazon Book Box for Kids, ASIN Lower depth stop rod (A) until it contacts base (D) and tighten screw (C). 7284 Manuals COMBO Package. The hydraulic cylinder (B) keeps the head in the up position. There are 0 customer reviews and 1 customer rating. A O N M P G B H R J F D H L E G C K Fig. The table (A) Fig. %3.3 This can be accomplished by inserting screwdriver into center hole of motor end cap (B) Fig. 4. Try again. Please try again. IF YOU ARE NOT thoroughly familiar with the operation of mortisers, obtain advice from your supervisor, instructor, or other qualified person. 7. Assemble tool and chisel holder (A) Fig. Assemble the holddown (H) Fig. 11, through hole in column as shown. % *B@fHNy-`!6x?2Eu@'AZ>3VID"^(rrA@,{W B&%RG x|8C/XLsoZ,@i#pW\Tn|s=v;8{i2'/N(j) $\ds!#[Zi#`+`\y|*cB'"YI qTT[Pyz?G+(*4uaeq) |0X#IB2+SBQ;2$9XjZ#T|8FS jlg(5QwZ&bl7d{+!-"ghEfEqI6hC+te}OJHg)6r0d"%Vd(IY.$~?[p Do not thread stud (D) all the way into hole at this time. X Jb{DI:UR.hPsYFDqC-m"-7%im$FQ|(I(i!y 7ix>pSBCOr 9pl^\SM1NxO_#y(L '.`FBKw7m2]=xp9%Y8ZH`,oEYx65MHv.%l1/&?f" ,WW>6 [/{&. 24 6.
This should provide the proper distance between the cutting lips of the bit and the points of the chisel. Sorry, there was a problem loading this page. Assemble the table (A) Fig. B A Fig. 30, can be moved in or out by loosening lever (B), sliding fence to the desired position and tightening lever (B). A B D Fig. Do not use acetone, gasoline, or lacquer thinner for this purpose. Download the free Kindle app and start reading Kindle books instantly on your smartphone, tablet, or computer - no Kindle device required. 29, is provided to limit the depth of the chisel (B). For Parts, Service, Warranty or other Assistance, please call ESPAOL: PGINA 19 1-800-223-7278 (In Canada call 1-800-463-3582). @Yuf=AN6]](1zn 7%ST@s'_fIS "*yF,G1){g'QFns \9 !Kl dDs'=tl-qmd?\ i5);3%. D0h!uJ@%.}'L}0DSP ~8b1%Z/*R.pO q0sdw $8\_9iSK)6up&I\$!g$g?"LD_K4^IN e>tj2hZo[Hrsr+ B 2. To turn the mortiser OFF move the switch to the down position A Fig. 2 illustrates the mortiser and all loose items removed from the carton. Fig. Adjustment is made by loosening the two screws (B) and turning adjusting screws (C). Then using chuck key, unscrew and remove chuck (C) Fig. 29 ADJUSTING FENCE The fence (A) Fig. Your recently viewed items and featured recommendations, Select the department you want to search in. 3 2. Make sure your extension cord is in good condition and is a 3-wire extension cord which has a 3-prong grounding type plug and a 3-hole receptacle which will accept the tools plug. dia.