We dont just welcome guests with a drink, but the longer you stay with us the more consistent the discount youre eligible to receive. This is because decoupling capacitors both filter out power supply noise and become instant charge supply. There's a good discussion in the RP2040 hardware design datasheet of how to calculate the crystal capacitors from the crystal's load capacitance. Your link has been automatically embedded. Pico is not a rival of Raspberry Pi Zero, it actually can work in conjunction with the regular Pi's. Enter "blink.py" as the file name. January 10 in Electronic Resources. To start, let go to Tools > Boards > Boards Manager and search for "Pico", select "Arduino Mbed OS RP2040 Boards" and hit the install button. On the sample PCB layout by the Raspberry Pi foundation, the outer rows are always ground pins while the inner pins are the IOs: This scheme is not required, but I personally found it convenient when designing the PCB. Longer traces will affect the signal.  The hostel is safe and has friendly staff. This hotel is situated in Porta Romana with Bocconi University, Fondazione Prada and the University of Milan nearby. The RP2040 is only available in one package size, QFN56, and I think it's safe to say that this makes the board impossible to solder with a conventional soldering iron. // ]]>, Tiny I2C Routines for all AVR Microcontrollers, Controlling RGB LED Strips with a Single Function, Using a Timer on the Arduino Uno or Arduino Zero, Simple Sprite Routines for the Wio Terminal, Simple Sprite Routines for the PyGamer/PyBadge, Minimal I2C for the New AVR Microcontrollers, Getting Started with the New ATtiny Chips, Using the ATmega1284 with the Arduino IDE, Programming ATtinys with Arduino 1.6.8 [Updated], Simple Rotary Encoder Interface [Updated], Driving LED Displays with Fewer I/O Lines, ABM3BAIG-12.000MHz-12-4-T Abracon Crystal 12MHzSMD, https://github.com/earlephilhower/arduino-pico, https://github.com/technoblogy/minimal-rp2040-board, Raspberry Pi: Here's how we built our own chip to power the Pico, Precision Straight Tweezers - Rhino SW-11, With a continuity tester checkbetween adjacent RP2040 pins to ensure that you haven't missed any solder bridges. Thonny comes with built-in Python 3.7, so just one simple installer is what you need to learn programming. When picking them up with the tweezers it's easy to accidentally flick them across the room, and they also tend to blow away if you get the hot air gun too close! Please follow the guides of Raspberry Pi to install and set up Pico for the Pico. Run the example, and you will find that the red LED is flahsing. Unlike on the Raspberry Pi Pico, the pin legends are on the top of the board. To be clear, the RP2040 doesnt require an external crystal oscillator. Pi Foundation officially supports MicroPython and C/C++, however high-level programming language like CircuitPython (A fork of MicroPython created by Adafruit), and Drag and Drop Python Editor like Pico Piper which adds further enhancements and can be used to program the Pico boards. You should then see the LED giving one-second flashes. Politecnico di Milano and Istituto Besta lie within the proximity of this hostel at Citta Studi. Connect the Pico to Raspberry Pi or PC. However, prices usually go slightly higher during the holiday season such as Christmas and the New Years Eve. It also recommends that the paths to the flash chip and crystal should be as short as possible, so I decided to include these on the breakout board too.
 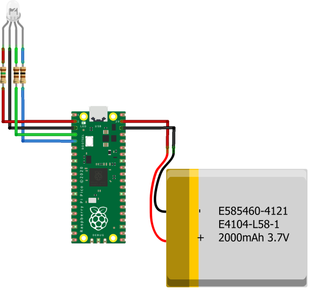 I recommend ordering a few spares in case this happens. It can be used to control other electronic modules and sensors same as any other microcontroller. 1. Unlike many other processors the RP2040 doesn't include flash on chip, but includes a QSPI flash interface to make it easy to interface an external flash chip. We all love our iPads, but are they bad for the environment? RP2040-Zero, A Low-Cost, High-Performance Pico-Like MCU Board Based On Raspberry Pi Microcontroller RP2040. However the only QFN56 breakout boards I could find arrange the pins in a square, making them unsuitable for a prototyping board. If you have designed PCB boards for STM32 microcontrollers before, then youll find that it is not much different from designing for an RP2040 microcontroller. Since, its a microcontroller it doesn't come with all the overheads that a computer brings and hence consumes much less current. It was designed in Cambridge, UK, by the team behind the Raspberry Pi boards,and is fabricated by TSMC using their 40nm process [1]. All the main components are on the top of the board, apart from the decoupling components which are on the bottom of the board to make the PCB layout simpler.
document.write('David Johnson-Davies<\/a>') As for PCB design, the RP2040 QSPI pins must be wired as close to the external QSPI flash IC as possible to avoid crosstalk. Here is the top view of the pinouts on the Raspberry Pi Pico.
I recommend ordering a few spares in case this happens. It can be used to control other electronic modules and sensors same as any other microcontroller. 1. Unlike many other processors the RP2040 doesn't include flash on chip, but includes a QSPI flash interface to make it easy to interface an external flash chip. We all love our iPads, but are they bad for the environment? RP2040-Zero, A Low-Cost, High-Performance Pico-Like MCU Board Based On Raspberry Pi Microcontroller RP2040. However the only QFN56 breakout boards I could find arrange the pins in a square, making them unsuitable for a prototyping board. If you have designed PCB boards for STM32 microcontrollers before, then youll find that it is not much different from designing for an RP2040 microcontroller. Since, its a microcontroller it doesn't come with all the overheads that a computer brings and hence consumes much less current. It was designed in Cambridge, UK, by the team behind the Raspberry Pi boards,and is fabricated by TSMC using their 40nm process [1]. All the main components are on the top of the board, apart from the decoupling components which are on the bottom of the board to make the PCB layout simpler.
document.write('David Johnson-Davies<\/a>') As for PCB design, the RP2040 QSPI pins must be wired as close to the external QSPI flash IC as possible to avoid crosstalk. Here is the top view of the pinouts on the Raspberry Pi Pico.
I'd been thinking about designing a project based on the Raspberry Pi RP2040, and to get more familiar with it I decided to try building a minimal RP2040-based computer on a prototyping board. * Pico can be used alone or in combination with Arduino for Automation and AI purposes. 
We also organize various fun activities for our guests. We target visitors whore looking for short-term or long-term stay at affordable costs. Difference between Raspberry Pi Pico and Arduino, 5. Ground planes are always a good idea; create one that readily connects the ground pin of the QSPI flash. This is smaller than I usually use so I was a bit apprehensive about working with them, but it wasn't too difficult. The pin-labels are on the bottom side of the board. Release BOOTSEL once the drive RPI-RP2 appears on your computer. Its a question, How to choose where to go on a holiday Choosing where to go on a holiday is one of the most challenging decisions. Arduino Pressure Sensor Tutorial | MPS20N0040D, MAX30102: An Improved Heart Rate Sensor for Arduino, Getting Started with PocketBeagle Mini SBC, Controlling a Servo Motor with BoneScript, Update ESP32 Firmware through External Web Server, ESP32 WiFi Manager | Dynamic SSID and Password, Controlling a Water Pump with WeMos D1 Mini, WiFi Servo Controller using WeMos D1 Mini, Persistence of Vision (POV) with Seven-segment Displays, Using Buttons and LEDs on the Curiosity HPC, Raspberry Pi Pico and HC-SR501 Motion Sensor, A Beginners Guide to Making a STM32 Board, Getting Started with Blue Pill and STM32Cube, Flame Sensor Project: Comprehensive Guide, Arduino Compass with HMC5883L Magnetometer, Everything you need to know about heavy copper PCB, 5 Steps To Understanding Your Residential Lease, PIC Assembly Instruction Set | Midrange Devices, What You Should Be Wary of with Online Dating? 1. Connect the boards as in the picture below. Its popular for its cleanliness. You'll either need a hot air gun, or a reflow oven. Paste as plain text instead, You can also try running uLisp, my Lisp for microcontrollers: You should then be able to select the USB port from the Port menu, selectSerial Monitorfrom theToolsmenu, and enter Lisp commands. Furthermore, each staff speaks at least 3 or 4 languages, including English, Italian and French. Other hostels in Lombardy include Combo Milano, Milano Ostello, Hostel Colours, Central Hostel BG, Ostello del Castello Tirano, Milan Hotel, and Ostello La Goliarda. 3. It is highly recommended that such capacitors (100 nF per power pin) are as close to power pins as possible. Open the Lesson-21 LCD1602 I2C example by Thonny, you need to first save the RGB1602.py to Pico and then run the Choose_Color.py file. You can post now and register later. Finally I soldered the remaining components on the top of the board, again using the hot air gun. Raspberry Pi Pico Get Started with MicroPython on Raspberry Pi Pico, Demo codes for Raspberry-Pi-Pico-Basic-Kit, Demo codes for Raspberry Pi Pico Sensor Kit, https://www.waveshare.com/w/index.php?title=RP2040-Zero&oldid=30976, RP2040 microcontroller chip designed by Raspberry Pi in the United Kingdom, Dual-core Arm Cortex M0+ processor, flexible clock running up to 133 MHz, 264KB of SRAM, and 2MB of on-board Flash memory, USB-C connector, keeps it up to date, easier to use, The castellated module allows soldering direct to carrier boards, Drag-and-drop programming using mass storage over USB, 29 multi-function GPIO pins (20 via edge pinout, others via solder points), 2 SPI, 2 I2C, 2 UART, 4 12-bit ADC, 16 controllable PWM channels, Accelerated floating-point libraries on-chip, 8 Programmable I/O (PIO) state machines for custom peripheral support, Please set the Thonny development environment to be RaspberryPi when setting. This is the maximum memory size selectable so you can select flash chips lower than this. Download and install "Thonny" free from the Thonny website for your version of OS. While many other microcontrollers have moved to USB-C, Pico is still coming with the micro-USB port. Installation of MicroPython on Pico requires a "UF2" file to be copied onto it. | CocoFinder, Creative Commons Attribution-NonCommercial 4.0 International License. For instructions on how to install it see: https://github.com/earlephilhower/arduino-pico.
Printing to a Serial LED Display, Copyright 2014-2020 If you run the Discoloratio.py file, the LED display RGB colors. Inevitably there may be some solder bridges between some of the package pins, and I used a conventional soldering iron with a fine tip to remove these. I recommend Earle PhilhowersRaspberry PiRP2040 Boardscore which supports a wide range of RP2040 boards, supports more Serial, SPI, and I2C ports, and gives significantly better performance than the Arduino RP2040 core.
This helps save even more money. First download the latest ARM version of uLisp from the. Open the Lesson-16 Potentiometer example by Thonny, you can adjust the potentiometer and check if the voltage printed to the Sheel window are changing as well. If this is not possible, use a microstrip impedance calculator to achieve the correct dimensions for an impedance of 90 ohms. But since then, it has just been sitting on my desk, collecting dust.
I bet, there must be a lot of project ideas going in your mind, so get your supplies and start coding. Required fields are marked *, Designing a PCB for the RP2040 Microcontroller, Comparison with Other ARM Microcontrollers. But the RP2040 is unique in the sense that it requires 3.3V for peripherals but only 1.1V for its digital core (DVDD). You cannot paste images directly. The USB connections are in the same order as on a USB breakout board, so you can plug one onto a prototyping board alongside the appropriate pins. However, it lacks kitchen equipment. The website's link is in the description below. Also connect an LED in series with a 220 resistor between GND and pin 25, which the core defines as LED_BUILTIN: Uploading Blink to the Minimal RP2040 Board. Our hostel atmosphere is friendly and inviting. Chiesa di San, San Lanfranco, Chiesa di Santa Maria del Carmine, and Pietro in Ciel dOro are close to this hostel in Pavia. Select the first of these three options (the others are for debugging). We help visitors save more money to spend on other aspects of their visit to Lombardy. 2. 3. It is a custom "System on Chip" (SoC) developed by the Raspberry Pi team in UK which features a dual core Arm Cortex M0+ processor running at 133 MHz, 264KB of SRAM and 2MB of flash memory for storing files on it. I also put a small blob of solder paste in the centre of the pad; this is essential as it's the ground connection. The RP2040 isa dual-core Arm Cortex-M0+ running at up to 133MHz, with 264 Kbytes of on-chip RAM, and support for up to 16 Mbytes of off-chip flash memory via a QSPI bus. Or order boards from PCBWay here: Minimal RP2040 Board. * Pico module supports MicroPython and C/C++, while Arduino codes are written in C/C++ using Arduino.IDE. I used the recommended part, the Winbond W25Q128JVS, which provides 16Mbytes, the largest amount of flash that the RP2040 will support.