Pneumatic machines Power Power supply Ref. Page 4 3 Set Up & Operation. : A.1 a Division of Pittway Corporation FRONT PANEL & VISUAL INDICATIONS GENERAL TROUBLE GENERAL PROGRAMMING IN PROGRESS ENABLE/ALARM/TROUBLE (ZONE 1 ALARM, DRM75A 230V 20/100A DIN rail single phase two wire energy meter 1.1 Safety instruction 1.2 Foreword 1.3 Performance criteria 1.4 Specifications 1.5 Basic errors 1.6 Description 1.7 Dimensions 1.8 Installation, MCR1900 Media Converter 19-Slot Chassis Installation Guide Part #5500304-11 Copyright Statement This document must not be reproduced in any way whatsoever, either printed or electronically, without the, Data Sheet Multi-Range Programmable DC Power Supplies 1200 W / 3000 W Multi-Range DC Power Supplies Features & Benefits Any model can replace several supplies on your bench or in your rack. Users Manual. Range: DIGICODE (Stand-Alone Keypad), 16-Port RS232 to USB2.0 High Speed Multi Serial Adapter (w/ Metal Case) Installation Guide, PC INTERFACE MODULES FOR TOLL-PLAZA CLASSIFICATION SENSORS, Series 6000 Torque measured metal bellow coupling. Connection, Technical Information THYRISTORS T1-1PH from 850A to 2700A Specifications Universal 1 Phase Thyristor Unit 55-77-03-62, March 2012 GENERAL DESCRIPTION THYRISTORS T1-1PH is a full digital and universal, 16/32 Channel 1U Rack Mount CCTV Power Supply Manual PH-A3224-GUQ Shown 16-Channel 32-Channel PTC PH-A1612-PUQ PH-A3224-PUQ Glass Fuse PH-A1612-GUQ PH-A3224-GUQ Industrial design 12 Amp 3 Amps per channel, Series LCD To power supply Electric Actuator Series LCC Stepper Motor Driver LCD Series LX Dedicated Stepper Motor Driver and Positioning Driver Series LCD/LCC PLC Positioning unit (Not incl. Option Card for Encoder of Line Driver Output. Place the switch in the "I" position (On). The temperature inside the cabinet should not go above 45 C. Integration cabinet 2 U Front panel 4 U of the CCU112 1 U THIS DOCUMENT IS EXCLUSIVE TO TECHNIFOR. HARDWARE DESCRIPTION 2 3. THYRISTORS T1-1PH from 850A to 2700A Specifications Universal 1 Phase Thyristor Unit 55-77-03-62, March 2012, 16/32 Channel 1U Rack Mount CCTV Power Supply, Series LC6D/LC6C. On/Off switch Fuse outlet Male DIN connector: - 4 pin 24V AC power supply - 3 pin 24V DC power supply RS232connector SubD25 F connector communication regrouping interface and 6E/2S Connector for the marking head Connector keyboard Fig. INTRODUCTION 1 2. Foreward This Control Unit is exclusively used to operate Technifor marking heads. Directory chapter 02 - DIN Power (to 6 A) Types D, E, F, FM, 2F, F9, interface connectors I/U 02. 
 Firmly insert the plugs, and tighten the locking rings. The oth, ACommunication C Ref. Unpacking . 3 3. ITGBFDEPPLMANUALE ISTRUZIONIINSTRUCTION MANUALMANUEL D'EMPLOIBEDIENUNGSANLEITUNGMANUAL DE INSTRUCCIONESMANUAL DE INSTRUESINSTRUKCJA OBSUGIKey Automation S.p.ACentrale elettronicaElectronic control unitCentrale lectroniqueElektronische SteuereinheitCentral electrnicaCentral electrnicaElektroniczna jednostka sterujca900CT-201www.gaecki.pl 900CT-201 Control Unit Instruction manual, 60, DI-724U - Wireless 108G QoS Office Router, TEMPSURE COMMERCIAL THERMOSTAT P/N TSTATBBP220-LA. Note The + 24 V internal voltage (pins 1 and 14) is not protected from short-circuits. : 200110 Thank you for purchasing the Loxone Twelve Channel Amplifier. MACHINE CHARACTERISTICS 2.1. EVR01.
 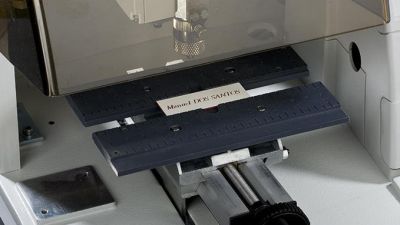 Description. Remarks The + 24 V internal voltage (pins 1 and 14) is not protected from short-circuits. N MO-0370-ING TEMPERATURE MONITOR DEVICE TYPE TEMON 8-C OPERATION MANUAL. HM-W536 Install Guide 9/13/2013 IMPORTANT SAFETY INSTRUCTIONS Warning - When using electrical devices, basic safety precautions should be followed to reduce the risk of fire, electrical shock or injury. HP 2530 8-Port Switches Quick Setup Guide. Any other use, or the use of a non TECHNIFOR marking head will be under the the exclusive responsibility of the operator. The maximun external power supply for the outputs is 24 volts DC. The output signal is proportional to measured frequency and is either load independent DC Current or load independent DC Voltage. DCD01/3067 - UC500_en_D 23/27 4. For any questions concerning the CT240 telephone remote control, please, JUMO GmbH & Co. KG Delivery address:mackenrodtstrae 14, 36039 Fulda, Germany Postal address: 36035 Fulda, Germany Phone: +49 661 6003-0 Fax: +49 661 6003-607 e-mail: mail@jumo.net Internet: www.jumo.net, Programmable indoor transmitter of temperature T0118 Programmable indoor transmitter of atmospheric pressure T2118 Programmable indoor transmitter of temperature, relative humidity and other derived humidity, How to read this guide The following shows the symbols used in this Quick start guide with descriptions and examples. Dosing System for Professional Laundry machines. 8 1-8 INTRODUCTION (DCD01/3028-MTEC4288/0407G0-CHP fm) 1.3) Identification plate of the marking equipment Your marking equipment can be identified by a serial plate found on top of the marking machine. Instruction Manual, Master Time Clock MTC-200 MTC-400 MTC-600. Your markings are visible and of high quality, irrespective of your application. to DIN EN 175301-803, Form A, TM7BDM8B expansion block - TM7 - IP67-8 DI/DO - 24V DC - 0.5 A - M8 connector, MagIC 6100. The, AInstallation D Ref. CAUTION OPC-LM1-IL. RS232 cord, to use the T101W marking program with Windows. The Outputs: are shielded. Is the On/Off switch in the "On"position? Information in this, General description EVR01 EVR01 is a device that allows you to recharge an Electrical Vehicle from any standard mono-phase source of power. Microener - Copyright 2010 FW 2.2 Date 01.12.2008 Rev. : 33 (0) Fax : 33 (0) Technifor Ltd - England Unit 3 Trojan Business Centre Tachbrook Park Estate LEAMINGTON SPA CV34V 6RH Warwickshire Tel. 3 (DCD01/3028-MTEC4288/0407G0-CHP fm) 1-3 INTRODUCTION 1 INTRODUCTION, 4 1-4 INTRODUCTION (DCD01/3028-MTEC4288/0407G0-CHP fm). Documento: M-010.1-MGAS-ENG. Identification of the marking equipment , Technifor UC500 A Ref. DCD01/3067 - UC500_en_D 15/27 Timing diagrams of the communication signals Operating mode with the internal program T05 Remarks Pause: Whatever the mode selected: when marking is interrupted, the "Marking ready" signal returns to phase 1. 2) START/STOP KEY (SELECTOR KEY) Used to start and stop, CM705B - Universal Expander Module CM707B - Plug On Zone Expander Security Systems EN Security System CM705B CM705B - Universal Expander Module The CM705B universal expander provides a cost effective way, .3 Contents EASY500/700/800 Intelligent Relays.. EASY/MFD Expansion Modules MFD Intelligent Relays. EASY/MFD Communication Modules. EASY/MFD Power Supplies, Accessories, SYSTEM 4C C R H Electronics Design SYSTEM 4C All in one modular 4 axis CNC drive board By C R Harding Specifications Main PCB & Input PCB Available with up to 4 Axis X, Y, Z, A outputs. The inputs can be dry-contact, or a NPN output transistor (ex: NPN inductive detector) I0 I (18) (13). This foot pedal is especially desi- gned for industrial work environments or for high r, C Ref. The hard drives are not dealt with. Only pages containing updated information will be sent to you. An integrated diode on the board allows for the inductive loads (Eg : solenoid valve) The maximum current that can commute an output is 100 ma. Card Reader & Controller with KIM Swipe Reader for Solitaire 850 / 950 / 850L Learnlok PK2930, Modular I/O System Analog and Digital Interface Modules, RI-215A Operator s Manual. Installation 3 5. 27 (DCD01/3028-MTEC4288/0407G0-CHP fm) 4-5 USING THE MACHINE 4.5) Reset connection The SubD25 connector including a bridge, is provided with the equipment, so that it can be tested immediately uponreceipt. Use the 3 points female plug delivered with the machine and connect as shown below. This quick start guide provides, basic installation information, drawings, first time power-on instructions, and short descriptions of key terms and concepts for installing the EntraGuard Platinum Telephone. Insert the new fuse. Please verify the serial number found on this plate before contacting TECHNIFOR. CONNECTION 6 5. This document may not be copied or reproduced in whole or in part, or transferred to any, Owner's Manual AutoRanging Digital MultiMeter Model No. : (49) Fax : (49) Technifor Marcadores Industriales SL - Spain Gran Via de les Corts Catalanes, BARCELONA Tel. 90164 Power cable 2 m (6.562 f, ADescription of the Control Unit B Ref. : 239548 Sales text Contactor,55kW/400V,AC operated. Number Description , ACommunication C Ref. Head/CCU connection Key connection (mini DIN) Cables for the communication interface card Fig. 34 4-12 USING THE MACHINE (DCD01/3028-MTEC4288/0407G0-CHP fm) Front panel (for the rack) Opening for the screen mounting holes on the front panel of the CCU when in the casing Opening for male connector Opening for the SubD9M (RS232) outlet Opening for the Keyboard cable Front panel of the CCU in the casing Window for the screen Integration cabinet Mounting in a cabinet Leave space on either side of the CCU to allow for the natural ventilation. AXIS 291 1U Video Server Rack Installation Guide About This Document This document describes how to install Axis blade video servers in the AXIS 291 1U Video Server Rack. he components of your marking equipment have been designed to function together. Features. Assembling the accessories Mounting the supporting feet (Case of the CCU installed on a workbench) Screw the supporting feet to the underside of the CCU, and check that t, Technifor UC500 AInstallation D Ref.
DCD01/3067 - UC500_en_D 13/27 Connection diagram for the dedicated Inputs / Outputs Note In the diagram above, the Inputs are wired to the internal power supply, available on the connector of the CCU (+ 24 V DC). The secondary transformer (24V AC) must not be connected to the protection conductor, as this connection is made within the UC112. 4.4) Connecting the 24V power supply Check that the voltage indicated on the power supply unit corresponds to your electric current : 115 or 230V. Power supply connection Plug the CCU to the power supply using the cable provided. This document is non contractual. Introduction The MILLENIUM series has been designed, Cable Plug acc. Use the M5 screws provided. 6. DATAMATRIX marking ( not available with all the marking heads 2.7) Overview of the Central Control Unit Integrated LCD screen Keyboard 105 keys AT 6 In / 2 Out RS232 and communication interface 24 V DC or 24 V AC electricity supply (according to marking head) Bench top version to put on a bench or to set 2 feet to screw in an electrical cabinet 2 square tabs to screw 115 VAC (US plug) / 24 VDC 230 VAC (CEE7 plug) / 24 VDC 230 VAC (UK plug) / 24 VDC 115 VAC (US plug) / 24 VAC 230 VAC (CEE7 plug) / 24 VAC 230 VAC (UK plug) / 24 VAC external power supply Standard version Mind Map Title 25/02/02 - v1 UC112 specifications 30/05/02 Head CM400 CN410 CN212C CN312S CN312C Pneumatic Scribing Scribing Pneumatic Micropercussion micropercussion Electromagnetic micropercussion Electromagnetic With protective bellow Without protective bellow M0C M1C M0C M1C 19" 4U rack (kit) T101W Standard marking software TW02 Backup of files between UC112 & PC RS232 cord Datamatrix marking (available according to the marking head) UC112 control panel with buttons UC112 special industrial guarded footswitch UC112 standard footswitch 3 pin M for 24 VDC 4 pin M for 24 VAC (DIN ) 24 V power supply SubD9M (RS232) SubD25F (communication interface terminal) Keyboard (105 keys AT) Mini-Din 6 pin Harting Sub-D25F Options CCU connections Head / CCU cord Default configuration (if UC112 delivered alone) 5 lengths 3 kinds CN212Cp (UC112p) CN312Cm (UC112m) 1 m 3 m 6 m 10 m 15 m Standard Robotic (on request) Oil resistant (on request), 17 (DCD01/3028-MTEC4288/0407G0-CHP fm) 3-1 FUNCTIONAL DEFINITIONS 3 FUNCTIONAL DEFINITIONS, 18 3-2 FUNCTIONAL DEFINITIONS (DCD01/3028-MTEC4288/0407G0-CHP fm), 19 (DCD01/3028-MTEC4288/0407G0-CHP fm) 3-3 FUNCTIONAL DEFINITIONS 3.1) Basic Operating diagram CONTROL UNIT ELECTRONIC CABINET INTERNAL HEAD MARKING CONNECTION PROTECTIVE MAINTENANCE OPTIONS ACCESSORIES CABLE CABLE/CCU HEAD CASING CPU board Supply Maintenance and instruction manual Power supply 115 / 24V (AC/DC) 230 / 24V (AC/DC) Foot support Power board SubD 9M RS232 Spare parts list Marking program T101W Fixing bracket LCD screen SubD 25F Interface board Rack for front panel Interface boards RS232-E/S Harting SubD 25F DATAMATRIX marking Fuse On/Off switch Ventilator. svvv Updated versions of this document, Square D Clipsal DIN-Rail Four-Channel Auxiliary Input Unit SLCLE5504AUX for Use with Wired C-Bus Networks Instruction Bulletin Retain for future use.
TECHNIFOR cannot be held responsible for any injuries resulting from disregard of the above rules of operation, or other general safety rules applicable to the use of this equipment. Type: EASY719 DC RC Article. THIS EQUIPMENT CONFORMS TO ALL SAFETY REGULATIONS IN EFFECT AT THE TIME OF MANUFACTURE To produce this manual, we have used a machine with a path of 100 x 100 mm. 5 - CCU with connections. Installation and user manual ENGLISH. 2 - Fig. The Control Unit is supplied with: 1 bridged male SubD9 connector, for the reset function 2 feet + 2 truss head screws, so it can be installed on a workbench 2 plates + 4 countersunk head screws, for wall mounting 1 : , Technifor UC500 ADescription of the Control Unit B Ref. FX14 Field Controller (1/4) FX14 Field Controller The FX14 is an equipment field controller in the Facility Explorer range of products. DCD01/3067 - UC500_en_D 26/27 EPreventive maintenance 1. The switch is an open "dry" contact (relay). 30 4-8 USING THE MACHINE (DCD01/3028-MTEC4288/0407G0-CHP fm) Example of the output wiring The outputs supply (max 24volts DC) must be provided by the operator REMEMBER TO RESPECT THE POLARITY O0 and O1 Outputs. 4.6) Description of the SubD25 connector pin Sub D Connector A SUB-D 25 female pins type is situated on the back panel of the CCU. Allow for a 2U space above and a 1U space below. Signal Converter. 1 - Front view of the CCU 2.2) Physical characteristics Dimensions in millimeters (Lxwxh) : 270 x 118 x 136 (without cables or fittings). DCD01/3067 - UC500_en_D 3/27 AIntroduction 1. Standard NF EN 61000-6-4 of March 2007 concerning electromagnetic compatibility (EMC) - Part 6-4: generic standards- Standard on emissions for industrial environments. GE Digital Energy. Introduction 3 3. www.technifor.com Technifor reserves all rights to modify its products. A.1. AquaSenseZTR SeriesAutomatic Sensor-Operated,Battery-Powered FlushometerInstallation, Operation, Maintenance, andParts ManualLIMITED WARRANTYAll goods sold hereunder are warranted to be free from defects in material and factory workmanship for a period of three years from the date of purchase. The current delivered by the + 24 V voltage (pin, ACommunication C Ref. 2064 AUSTRALIA National: Phone: (02) 9489 3744 Fax: (02) 9439 7439 International: +61 2 9439 3744 +61 2 9439 7439 Email: Electropneumatic control valves 7 Miniature solenoid valves for alternating current Conform to the Low Voltage Directive or mounting on subbase or footprint in accordance with CNOMO recoendation E 066120N. : (34) Fax : (34) Technifor Gravograph - Switzerland Champ Olivier 2 Ch 3280 MORAT Tel. DCD01/3067 - UC500_en_D 14/27 Description of the communication signals Start marking (Input) - To activate the "Start marking" Input, establish a zero potential electrical connection between pins 4 and 5. Relay or solenoid valve s power < 3W O0 O1 (10) (12) (22) (23) (24) (25) V1 power supply, output n 1 (24V maximum) V2 power supply Output n 2 (24V maximum) Equipotential connection if necessary If necessary, the V1 and V2 power supply may be different. a Division of Pittway Corporation. So it facilitates the development of a unique identification system for your workpieces and reduces the risk of error. GE Digital Energy. Always leave a gap of 3 cm (1.181 in) above the CCUs cooling fan. Point of Sales Terminals TD06014B, TECHNICAL DATASHEET #TD1404AX PWM CONTROLLED SOLENOID DRIVER, Specifications H8CA-S H8CA-S RATINGS. You will be responsible for inserting these updated pages into your manual. Surface applied door closer. Attach the CCU to the brackets using the screws provided. : 33 (0)4 78 55 85 85 Fax: 33 (0)4 78 55 22 94 E-mail: [emailprotected] U.S.A. Technifor Inc. 9800-J Southern Pine Boulevard CHARLOTTE, NC 28273 Tel. 9 (DCD01/3028-MTEC4288/0407G0-CHP fm) 1-9 INTRODUCTION 1.5) Recommendations and security at the work post For security and productivity reasons, the reading of this manual is indispensable for all operators before the marking equipment is put into operation.. List of accessories available upon request The accessories mentioned below are available upon request. Description The Control Unit is designed to manage the markings performed by the numerically controlled heads manufactured by Technifor. DCD01/3067 - UC500_en_D 16/27 Maintained mode: End of marking cycle Marking Marking Impulse Start cycle Information Marking in progress Ready to marking Marking File loaded Page 8 4 Maintenance & Accessories. Fuse holder Diode bridges Fig. Identification plate 2. Technical specifications pneumatic micro-percussion and scribing machines - power supply: 90-253 V AC - 50-60 Hz - power: 150 VA electromagnetic micro-percussion machines - power supply: 90-253 V AC - 50-, ADescription of the Control Unit B Ref. DCD01/3067 - UC500_en_D 9/27 5. 7 (DCD01/3028-MTEC4288/0407G0-CHP fm) 1-7 INTRODUCTION 1.2) Foreword The Control Unit has been designed for exclusive use for operating TECHNIFOR marking heads. DCD01/3067 - UC500_en_D 27/27 FAppendix To contact the GravoTech Group FRANCE GravoTech Marking SAS 114, quai du Rh ne 01708 MIRIBEL Cedex Tel. Vroom CANBUS USER INTERFACE WITH LCD GRAPHIC DISPLAY AND WITH TEMPERATURE AND HUMIDITY SENSOR, ECR Shelf System Installation Guide Centralized Rack Mount Call Recording, When any of the following symbols appear, read the associated information carefully. DCD01/3067 - UC500_en_D - Last updated: 01/2009 2. It contains dedicated All-or-Nothing Inputs and Outputs. Use, user guide Meridian 558 Multi Channel Power Amplifier, Solar Home System. 2.3) Technical characteristics Micro-percussion and scribe machines Power supply : 24 V DC 10 % 3A. DCD01/3067 - UC500_en_D 22/27 DInstallation 1. This connector is to be plugged into the socket for the DB25 communication interface (see paragraph 4.6.1). OPERATING AND MAINTENANCE MANUAL UC500 CONTROL UNIT FOR MARKING MACHINES Ref. If this connection is not made, the reset function will remain active and no marking will be possible Special Output wiring End of Marking (pulsating signal for 400ms) Information about "End of Marking" is available between pins 1 and 14. AC-115 Compact Networked Single Controller Installation and User Manual December 2007 Table of Contents Table of Contents 1. DCD01/3067 - UC500_en_D 10/27 6. Match. Several adjustment modes are available: automatic mode (I-Sense), programmable mode and normal mode, which allows manual adjustment by means of buttons located on the side of the machine. IT IS FORBIDDEN TO USE IT OR TO COMMUNICATE IT WITHOUT AUTHORIZATION, 15 (DCD01/3028-MTEC4288/0407G0-CHP fm) 2.5) Plan of the overall dimensions of the CCU on a rack 2-5 DESCRIPTION OF THE UC Mounting in a cabinet Leave space on either side of the CCU to allow for the natural ventilation. General Points 1.2. BA295SEinbauanleitung Installation instructions Notice de montage Istruzioni di montaggioAsennusohje MonteringsvejledningenAnleitung zum spteren Gebrauch aufbewahren!Keep instructions for later use!Conserver la notice pour usage ultrieur!Conservare le istruzioni per uso successivo!Silyt ohje vastaisen varalle!Vejledning opbevares for senere brug!SystemtrennerBackflow PreventerDisconnecteur BA295S Control Unit Installation instructions manual, 30. 6 - SUB-D25 male connector- to be wired Function of the pins N DESCRIPTION FUNCTION 1 End of Marking : Dry contact (between pins 1 & 14) Output 14 End of Marking : Dry contact (between pins 1 & 14) Output 2 Start Marking : Digital Input terminal (contact between pins 2 & 15) Input 15 Start Marking : Digital Input terminal (contact between pins 2 & 15) Input 3 Reset Marking : Digital Input terminal (contact between pins 3 & 16) Input 16 Reset Marking : Digital Input terminal (contact between pins 3 & 16) Input 4 UC ready: Dry contact (between pins 4 & 17) Output 17 UC ready: Dry contact (between pins 4 & 17) Output 5 24VDC available to supply input 18 Potential VE supply of input (24V DC max) Input 6 Digital Input terminal - I0 - I consumed (en ma) = VE / 2.35 Input 19 Digital Input terminal - I1 - I consumed (en ma) = VE / 2.35 Input 7 Digital Input terminal - I2 - I consumed (en ma) = VE / 2.35 Input 20 Digital Input terminal - I3 - I consumed (en ma) = VE / 2.35 Input 8 Digital Input terminal - I4 - I consumed (en ma) = VE / 2.35 Input 21 Digital Input terminal - I5 - I consumed (en ma) = VE / 2.35 Input 9 Not available 22 Potential positive supply of output terminal n 1 (24V DC max) Output 10 Output n 1 connection - I switchable max = 100 ma Output 23 0V Supply output n 1 Output 11 Not available 24 Potential positive supply of output terminal n 2 (24V DC max) Output 12 Output terminal n 2 connection - I switchable max = 100 ma Output 25 0V supply output terminal n 2 Output 13 0V common connection of the input terminals Input, 28 4-6 USING THE MACHINE (DCD01/3028-MTEC4288/0407G0-CHP fm) Characteristics of inputs There are six TTL inputs available.
Firmly insert the plugs, and tighten the locking rings. The oth, ACommunication C Ref. Unpacking . 3 3. ITGBFDEPPLMANUALE ISTRUZIONIINSTRUCTION MANUALMANUEL D'EMPLOIBEDIENUNGSANLEITUNGMANUAL DE INSTRUCCIONESMANUAL DE INSTRUESINSTRUKCJA OBSUGIKey Automation S.p.ACentrale elettronicaElectronic control unitCentrale lectroniqueElektronische SteuereinheitCentral electrnicaCentral electrnicaElektroniczna jednostka sterujca900CT-201www.gaecki.pl 900CT-201 Control Unit Instruction manual, 60, DI-724U - Wireless 108G QoS Office Router, TEMPSURE COMMERCIAL THERMOSTAT P/N TSTATBBP220-LA. Note The + 24 V internal voltage (pins 1 and 14) is not protected from short-circuits. : 200110 Thank you for purchasing the Loxone Twelve Channel Amplifier. MACHINE CHARACTERISTICS 2.1. EVR01. Description. Remarks The + 24 V internal voltage (pins 1 and 14) is not protected from short-circuits. N MO-0370-ING TEMPERATURE MONITOR DEVICE TYPE TEMON 8-C OPERATION MANUAL. HM-W536 Install Guide 9/13/2013 IMPORTANT SAFETY INSTRUCTIONS Warning - When using electrical devices, basic safety precautions should be followed to reduce the risk of fire, electrical shock or injury. HP 2530 8-Port Switches Quick Setup Guide. Any other use, or the use of a non TECHNIFOR marking head will be under the the exclusive responsibility of the operator. The maximun external power supply for the outputs is 24 volts DC. The output signal is proportional to measured frequency and is either load independent DC Current or load independent DC Voltage. DCD01/3067 - UC500_en_D 23/27 4. For any questions concerning the CT240 telephone remote control, please, JUMO GmbH & Co. KG Delivery address:mackenrodtstrae 14, 36039 Fulda, Germany Postal address: 36035 Fulda, Germany Phone: +49 661 6003-0 Fax: +49 661 6003-607 e-mail: mail@jumo.net Internet: www.jumo.net, Programmable indoor transmitter of temperature T0118 Programmable indoor transmitter of atmospheric pressure T2118 Programmable indoor transmitter of temperature, relative humidity and other derived humidity, How to read this guide The following shows the symbols used in this Quick start guide with descriptions and examples. Dosing System for Professional Laundry machines. 8 1-8 INTRODUCTION (DCD01/3028-MTEC4288/0407G0-CHP fm) 1.3) Identification plate of the marking equipment Your marking equipment can be identified by a serial plate found on top of the marking machine. Instruction Manual, Master Time Clock MTC-200 MTC-400 MTC-600. Your markings are visible and of high quality, irrespective of your application. to DIN EN 175301-803, Form A, TM7BDM8B expansion block - TM7 - IP67-8 DI/DO - 24V DC - 0.5 A - M8 connector, MagIC 6100. The, AInstallation D Ref. CAUTION OPC-LM1-IL. RS232 cord, to use the T101W marking program with Windows. The Outputs: are shielded. Is the On/Off switch in the "On"position? Information in this, General description EVR01 EVR01 is a device that allows you to recharge an Electrical Vehicle from any standard mono-phase source of power. Microener - Copyright 2010 FW 2.2 Date 01.12.2008 Rev. : 33 (0) Fax : 33 (0) Technifor Ltd - England Unit 3 Trojan Business Centre Tachbrook Park Estate LEAMINGTON SPA CV34V 6RH Warwickshire Tel. 3 (DCD01/3028-MTEC4288/0407G0-CHP fm) 1-3 INTRODUCTION 1 INTRODUCTION, 4 1-4 INTRODUCTION (DCD01/3028-MTEC4288/0407G0-CHP fm). Documento: M-010.1-MGAS-ENG. Identification of the marking equipment , Technifor UC500 A Ref. DCD01/3067 - UC500_en_D 15/27 Timing diagrams of the communication signals Operating mode with the internal program T05 Remarks Pause: Whatever the mode selected: when marking is interrupted, the "Marking ready" signal returns to phase 1. 2) START/STOP KEY (SELECTOR KEY) Used to start and stop, CM705B - Universal Expander Module CM707B - Plug On Zone Expander Security Systems EN Security System CM705B CM705B - Universal Expander Module The CM705B universal expander provides a cost effective way, .3 Contents EASY500/700/800 Intelligent Relays.. EASY/MFD Expansion Modules MFD Intelligent Relays. EASY/MFD Communication Modules. EASY/MFD Power Supplies, Accessories, SYSTEM 4C C R H Electronics Design SYSTEM 4C All in one modular 4 axis CNC drive board By C R Harding Specifications Main PCB & Input PCB Available with up to 4 Axis X, Y, Z, A outputs. The inputs can be dry-contact, or a NPN output transistor (ex: NPN inductive detector) I0 I (18) (13). This foot pedal is especially desi- gned for industrial work environments or for high r, C Ref. The hard drives are not dealt with. Only pages containing updated information will be sent to you. An integrated diode on the board allows for the inductive loads (Eg : solenoid valve) The maximum current that can commute an output is 100 ma. Card Reader & Controller with KIM Swipe Reader for Solitaire 850 / 950 / 850L Learnlok PK2930, Modular I/O System Analog and Digital Interface Modules, RI-215A Operator s Manual. Installation 3 5. 27 (DCD01/3028-MTEC4288/0407G0-CHP fm) 4-5 USING THE MACHINE 4.5) Reset connection The SubD25 connector including a bridge, is provided with the equipment, so that it can be tested immediately uponreceipt. Use the 3 points female plug delivered with the machine and connect as shown below. This quick start guide provides, basic installation information, drawings, first time power-on instructions, and short descriptions of key terms and concepts for installing the EntraGuard Platinum Telephone. Insert the new fuse. Please verify the serial number found on this plate before contacting TECHNIFOR. CONNECTION 6 5. This document may not be copied or reproduced in whole or in part, or transferred to any, Owner's Manual AutoRanging Digital MultiMeter Model No. : (49) Fax : (49) Technifor Marcadores Industriales SL - Spain Gran Via de les Corts Catalanes, BARCELONA Tel. 90164 Power cable 2 m (6.562 f, ADescription of the Control Unit B Ref. : 239548 Sales text Contactor,55kW/400V,AC operated. Number Description , ACommunication C Ref. Head/CCU connection Key connection (mini DIN) Cables for the communication interface card Fig. 34 4-12 USING THE MACHINE (DCD01/3028-MTEC4288/0407G0-CHP fm) Front panel (for the rack) Opening for the screen mounting holes on the front panel of the CCU when in the casing Opening for male connector Opening for the SubD9M (RS232) outlet Opening for the Keyboard cable Front panel of the CCU in the casing Window for the screen Integration cabinet Mounting in a cabinet Leave space on either side of the CCU to allow for the natural ventilation. AXIS 291 1U Video Server Rack Installation Guide About This Document This document describes how to install Axis blade video servers in the AXIS 291 1U Video Server Rack. he components of your marking equipment have been designed to function together. Features. Assembling the accessories Mounting the supporting feet (Case of the CCU installed on a workbench) Screw the supporting feet to the underside of the CCU, and check that t, Technifor UC500 AInstallation D Ref. DCD01/3067 - UC500_en_D 13/27 Connection diagram for the dedicated Inputs / Outputs Note In the diagram above, the Inputs are wired to the internal power supply, available on the connector of the CCU (+ 24 V DC). The secondary transformer (24V AC) must not be connected to the protection conductor, as this connection is made within the UC112. 4.4) Connecting the 24V power supply Check that the voltage indicated on the power supply unit corresponds to your electric current : 115 or 230V. Power supply connection Plug the CCU to the power supply using the cable provided. This document is non contractual. Introduction The MILLENIUM series has been designed, Cable Plug acc. Use the M5 screws provided. 6. DATAMATRIX marking ( not available with all the marking heads 2.7) Overview of the Central Control Unit Integrated LCD screen Keyboard 105 keys AT 6 In / 2 Out RS232 and communication interface 24 V DC or 24 V AC electricity supply (according to marking head) Bench top version to put on a bench or to set 2 feet to screw in an electrical cabinet 2 square tabs to screw 115 VAC (US plug) / 24 VDC 230 VAC (CEE7 plug) / 24 VDC 230 VAC (UK plug) / 24 VDC 115 VAC (US plug) / 24 VAC 230 VAC (CEE7 plug) / 24 VAC 230 VAC (UK plug) / 24 VAC external power supply Standard version Mind Map Title 25/02/02 - v1 UC112 specifications 30/05/02 Head CM400 CN410 CN212C CN312S CN312C Pneumatic Scribing Scribing Pneumatic Micropercussion micropercussion Electromagnetic micropercussion Electromagnetic With protective bellow Without protective bellow M0C M1C M0C M1C 19" 4U rack (kit) T101W Standard marking software TW02 Backup of files between UC112 & PC RS232 cord Datamatrix marking (available according to the marking head) UC112 control panel with buttons UC112 special industrial guarded footswitch UC112 standard footswitch 3 pin M for 24 VDC 4 pin M for 24 VAC (DIN ) 24 V power supply SubD9M (RS232) SubD25F (communication interface terminal) Keyboard (105 keys AT) Mini-Din 6 pin Harting Sub-D25F Options CCU connections Head / CCU cord Default configuration (if UC112 delivered alone) 5 lengths 3 kinds CN212Cp (UC112p) CN312Cm (UC112m) 1 m 3 m 6 m 10 m 15 m Standard Robotic (on request) Oil resistant (on request), 17 (DCD01/3028-MTEC4288/0407G0-CHP fm) 3-1 FUNCTIONAL DEFINITIONS 3 FUNCTIONAL DEFINITIONS, 18 3-2 FUNCTIONAL DEFINITIONS (DCD01/3028-MTEC4288/0407G0-CHP fm), 19 (DCD01/3028-MTEC4288/0407G0-CHP fm) 3-3 FUNCTIONAL DEFINITIONS 3.1) Basic Operating diagram CONTROL UNIT ELECTRONIC CABINET INTERNAL HEAD MARKING CONNECTION PROTECTIVE MAINTENANCE OPTIONS ACCESSORIES CABLE CABLE/CCU HEAD CASING CPU board Supply Maintenance and instruction manual Power supply 115 / 24V (AC/DC) 230 / 24V (AC/DC) Foot support Power board SubD 9M RS232 Spare parts list Marking program T101W Fixing bracket LCD screen SubD 25F Interface board Rack for front panel Interface boards RS232-E/S Harting SubD 25F DATAMATRIX marking Fuse On/Off switch Ventilator. svvv Updated versions of this document, Square D Clipsal DIN-Rail Four-Channel Auxiliary Input Unit SLCLE5504AUX for Use with Wired C-Bus Networks Instruction Bulletin Retain for future use.
TECHNIFOR cannot be held responsible for any injuries resulting from disregard of the above rules of operation, or other general safety rules applicable to the use of this equipment. Type: EASY719 DC RC Article. THIS EQUIPMENT CONFORMS TO ALL SAFETY REGULATIONS IN EFFECT AT THE TIME OF MANUFACTURE To produce this manual, we have used a machine with a path of 100 x 100 mm. 5 - CCU with connections. Installation and user manual ENGLISH. 2 - Fig. The Control Unit is supplied with: 1 bridged male SubD9 connector, for the reset function 2 feet + 2 truss head screws, so it can be installed on a workbench 2 plates + 4 countersunk head screws, for wall mounting 1 : , Technifor UC500 ADescription of the Control Unit B Ref. FX14 Field Controller (1/4) FX14 Field Controller The FX14 is an equipment field controller in the Facility Explorer range of products. DCD01/3067 - UC500_en_D 26/27 EPreventive maintenance 1. The switch is an open "dry" contact (relay). 30 4-8 USING THE MACHINE (DCD01/3028-MTEC4288/0407G0-CHP fm) Example of the output wiring The outputs supply (max 24volts DC) must be provided by the operator REMEMBER TO RESPECT THE POLARITY O0 and O1 Outputs. 4.6) Description of the SubD25 connector pin Sub D Connector A SUB-D 25 female pins type is situated on the back panel of the CCU. Allow for a 2U space above and a 1U space below. Signal Converter. 1 - Front view of the CCU 2.2) Physical characteristics Dimensions in millimeters (Lxwxh) : 270 x 118 x 136 (without cables or fittings). DCD01/3067 - UC500_en_D 3/27 AIntroduction 1. Standard NF EN 61000-6-4 of March 2007 concerning electromagnetic compatibility (EMC) - Part 6-4: generic standards- Standard on emissions for industrial environments. GE Digital Energy. Introduction 3 3. www.technifor.com Technifor reserves all rights to modify its products. A.1. AquaSenseZTR SeriesAutomatic Sensor-Operated,Battery-Powered FlushometerInstallation, Operation, Maintenance, andParts ManualLIMITED WARRANTYAll goods sold hereunder are warranted to be free from defects in material and factory workmanship for a period of three years from the date of purchase. The current delivered by the + 24 V voltage (pin, ACommunication C Ref. 2064 AUSTRALIA National: Phone: (02) 9489 3744 Fax: (02) 9439 7439 International: +61 2 9439 3744 +61 2 9439 7439 Email: Electropneumatic control valves 7 Miniature solenoid valves for alternating current Conform to the Low Voltage Directive or mounting on subbase or footprint in accordance with CNOMO recoendation E 066120N. : (34) Fax : (34) Technifor Gravograph - Switzerland Champ Olivier 2 Ch 3280 MORAT Tel. DCD01/3067 - UC500_en_D 14/27 Description of the communication signals Start marking (Input) - To activate the "Start marking" Input, establish a zero potential electrical connection between pins 4 and 5. Relay or solenoid valve s power < 3W O0 O1 (10) (12) (22) (23) (24) (25) V1 power supply, output n 1 (24V maximum) V2 power supply Output n 2 (24V maximum) Equipotential connection if necessary If necessary, the V1 and V2 power supply may be different. a Division of Pittway Corporation. So it facilitates the development of a unique identification system for your workpieces and reduces the risk of error. GE Digital Energy. Always leave a gap of 3 cm (1.181 in) above the CCUs cooling fan. Point of Sales Terminals TD06014B, TECHNICAL DATASHEET #TD1404AX PWM CONTROLLED SOLENOID DRIVER, Specifications H8CA-S H8CA-S RATINGS. You will be responsible for inserting these updated pages into your manual. Surface applied door closer. Attach the CCU to the brackets using the screws provided. : 33 (0)4 78 55 85 85 Fax: 33 (0)4 78 55 22 94 E-mail: [emailprotected] U.S.A. Technifor Inc. 9800-J Southern Pine Boulevard CHARLOTTE, NC 28273 Tel. 9 (DCD01/3028-MTEC4288/0407G0-CHP fm) 1-9 INTRODUCTION 1.5) Recommendations and security at the work post For security and productivity reasons, the reading of this manual is indispensable for all operators before the marking equipment is put into operation.. List of accessories available upon request The accessories mentioned below are available upon request. Description The Control Unit is designed to manage the markings performed by the numerically controlled heads manufactured by Technifor. DCD01/3067 - UC500_en_D 16/27 Maintained mode: End of marking cycle Marking Marking Impulse Start cycle Information Marking in progress Ready to marking Marking File loaded Page 8 4 Maintenance & Accessories. Fuse holder Diode bridges Fig. Identification plate 2. Technical specifications pneumatic micro-percussion and scribing machines - power supply: 90-253 V AC - 50-60 Hz - power: 150 VA electromagnetic micro-percussion machines - power supply: 90-253 V AC - 50-, ADescription of the Control Unit B Ref. DCD01/3067 - UC500_en_D 9/27 5. 7 (DCD01/3028-MTEC4288/0407G0-CHP fm) 1-7 INTRODUCTION 1.2) Foreword The Control Unit has been designed for exclusive use for operating TECHNIFOR marking heads. DCD01/3067 - UC500_en_D 27/27 FAppendix To contact the GravoTech Group FRANCE GravoTech Marking SAS 114, quai du Rh ne 01708 MIRIBEL Cedex Tel. Vroom CANBUS USER INTERFACE WITH LCD GRAPHIC DISPLAY AND WITH TEMPERATURE AND HUMIDITY SENSOR, ECR Shelf System Installation Guide Centralized Rack Mount Call Recording, When any of the following symbols appear, read the associated information carefully. DCD01/3067 - UC500_en_D - Last updated: 01/2009 2. It contains dedicated All-or-Nothing Inputs and Outputs. Use, user guide Meridian 558 Multi Channel Power Amplifier, Solar Home System. 2.3) Technical characteristics Micro-percussion and scribe machines Power supply : 24 V DC 10 % 3A. DCD01/3067 - UC500_en_D 22/27 DInstallation 1. This connector is to be plugged into the socket for the DB25 communication interface (see paragraph 4.6.1). OPERATING AND MAINTENANCE MANUAL UC500 CONTROL UNIT FOR MARKING MACHINES Ref. If this connection is not made, the reset function will remain active and no marking will be possible Special Output wiring End of Marking (pulsating signal for 400ms) Information about "End of Marking" is available between pins 1 and 14. AC-115 Compact Networked Single Controller Installation and User Manual December 2007 Table of Contents Table of Contents 1. DCD01/3067 - UC500_en_D 10/27 6. Match. Several adjustment modes are available: automatic mode (I-Sense), programmable mode and normal mode, which allows manual adjustment by means of buttons located on the side of the machine. IT IS FORBIDDEN TO USE IT OR TO COMMUNICATE IT WITHOUT AUTHORIZATION, 15 (DCD01/3028-MTEC4288/0407G0-CHP fm) 2.5) Plan of the overall dimensions of the CCU on a rack 2-5 DESCRIPTION OF THE UC Mounting in a cabinet Leave space on either side of the CCU to allow for the natural ventilation. General Points 1.2. BA295SEinbauanleitung Installation instructions Notice de montage Istruzioni di montaggioAsennusohje MonteringsvejledningenAnleitung zum spteren Gebrauch aufbewahren!Keep instructions for later use!Conserver la notice pour usage ultrieur!Conservare le istruzioni per uso successivo!Silyt ohje vastaisen varalle!Vejledning opbevares for senere brug!SystemtrennerBackflow PreventerDisconnecteur BA295S Control Unit Installation instructions manual, 30. 6 - SUB-D25 male connector- to be wired Function of the pins N DESCRIPTION FUNCTION 1 End of Marking : Dry contact (between pins 1 & 14) Output 14 End of Marking : Dry contact (between pins 1 & 14) Output 2 Start Marking : Digital Input terminal (contact between pins 2 & 15) Input 15 Start Marking : Digital Input terminal (contact between pins 2 & 15) Input 3 Reset Marking : Digital Input terminal (contact between pins 3 & 16) Input 16 Reset Marking : Digital Input terminal (contact between pins 3 & 16) Input 4 UC ready: Dry contact (between pins 4 & 17) Output 17 UC ready: Dry contact (between pins 4 & 17) Output 5 24VDC available to supply input 18 Potential VE supply of input (24V DC max) Input 6 Digital Input terminal - I0 - I consumed (en ma) = VE / 2.35 Input 19 Digital Input terminal - I1 - I consumed (en ma) = VE / 2.35 Input 7 Digital Input terminal - I2 - I consumed (en ma) = VE / 2.35 Input 20 Digital Input terminal - I3 - I consumed (en ma) = VE / 2.35 Input 8 Digital Input terminal - I4 - I consumed (en ma) = VE / 2.35 Input 21 Digital Input terminal - I5 - I consumed (en ma) = VE / 2.35 Input 9 Not available 22 Potential positive supply of output terminal n 1 (24V DC max) Output 10 Output n 1 connection - I switchable max = 100 ma Output 23 0V Supply output n 1 Output 11 Not available 24 Potential positive supply of output terminal n 2 (24V DC max) Output 12 Output terminal n 2 connection - I switchable max = 100 ma Output 25 0V supply output terminal n 2 Output 13 0V common connection of the input terminals Input, 28 4-6 USING THE MACHINE (DCD01/3028-MTEC4288/0407G0-CHP fm) Characteristics of inputs There are six TTL inputs available.