q Procedure explained to the patient.
Perform oral hygiene on the patient after suctioning. {aJlA=)M/M2#B>f vu5h'Bf"KH !3)`_6Hx:1+BG]DD4"#PT!,cfya[S3B!~_3i4c|]QgW429JnL/tv)(1$*IWv;ZZy8MJe3n,$C 7 sqK],@ME#cR< M#C03F4U2y3}ZjBEhAF%AcaDFF'5:sg&2Mn5,Yt(h'bEI3WD``1=+#AjCsPxVxF@2=# Px8 .1NK}&.P#6tlf&Ayu97rs&3m8Q{o>F&[9ja@p}8?+]s S}P{a*Tw_W$R7 0-~@9,@$i>ENgJ@R ! <> endobj For oropharyngeal suctioning, a device called a Yankauer suction tip is typically used for suctioning mouth secretions.
Lippincott procedures. Don sterile gloves. endstream
Nasopharyngeal suctioning removes secretions from the nasal cavity, pharynx, and throat by inserting a flexible, soft suction catheter through the nares. Move the bedside table close to your work area and raise it to waist height.
Hy]Ei ]/xvX4fR*#)%*8Vj:u|TJ-wPIQ~
<>/ExtGState<>/ProcSet[/PDF/Text/ImageB/ImageC/ImageI] >>/MediaBox[ 0 0 612 792] /Contents 4 0 R/Group<>/Tabs/S/StructParents 0>> Set it up on the work surface and fill with sterile saline using sterile technique. 3 0 obj
:}P.XT5aWbo^?_#lif'$w"ICKH&"{CV>OKheF.%86? The ventilator will often alarm during suctioning. -@a(&9BKbb{+?Dr {y$>!MV3=wm,$j!TH!b. d1AGCd2X.p)LV884}LuiE 0_wc2js'S8 RT)uxSL`B$*+:b:>&2Ne@"q5=&- 29,IPg>ERS Nsek@@P'g"tR9~1;eks[DJo#AL}_}>}I>L&X2x?i6iGoS,cHa U1ciPz^2j^7{ Ol=9f"B;D 6xp"V*2e \_rg)Hwg:?;w7> 4 0 obj For nasopharyngeal suctioning, gently insert the catheter through the naris and along the floor of the nostril toward the trachea. <>>>/BBox[ 0 0 149.67 74.835] /Matrix[ 0.48106 0 0 0.96212 0 0] /Length 49>> <> Occlude the suction valve on the catheter to check for suction.
How do I prevent the spread of infection? endobj <>
10 0 obj
<>
10 0 obj
150.8 0 0 75.993 0 -1.1585 cm
endobj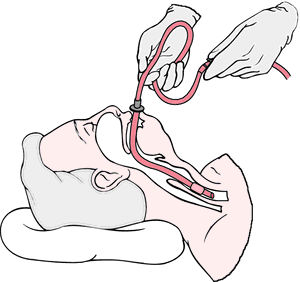 Don additional PPE. 0
Suction only on withdrawal and do not suction for more than 10 to 15 seconds at a time to minimize tissue trauma. A Yankauer device is rigid and has several holes for suctioning secretions that are commonly thick and difficult for the patient to clear. 7 0 obj
Ba?-_\w!6aFr?y_ xjk4'JF_F{Za4cb =oe4=_6p[=NB)yCD#(B43(~l}Id bkGq*6i"56n_|}zYwLV|FJ0 ve$5ATFr`x40;O#Rozv+65tX.
Don additional PPE. 0
Suction only on withdrawal and do not suction for more than 10 to 15 seconds at a time to minimize tissue trauma. A Yankauer device is rigid and has several holes for suctioning secretions that are commonly thick and difficult for the patient to clear. 7 0 obj
Ba?-_\w!6aFr?y_ xjk4'JF_F{Za4cb =oe4=_6p[=NB)yCD#(B43(~l}Id bkGq*6i"56n_|}zYwLV|FJ0 ve$5ATFr`x40;O#Rozv+65tX.
13 0 obj (2004). <>
<> If conscious, place the patient in a semi-Fowlers position. <>>> <>>> No cyanosis present. Assess the effectiveness of suctioning by listening to lung sounds and repeat, as needed, and according to the patients tolerance. <>
 Suctioning is indicated when the patient is unable to clear secretions and/or when there is audible or visible evidence of secretions in the large/central airways that persist in spite of the patients best cough effort.
Suctioning is sometimes done when the patient does not have a breathing tube. A small amount of clear, white, thick sputum was obtained. We may need to give the patient a medication to relax their breathing.
xZn7}7S[A\E>}X-@R[ywmP;rHiGX6C}a%y y}u~)S8SU:r[B,]i
Patient complaining of not being able to cough up secretions.
Pick up the connecting tubing with the nondominant hand and connect the tubing and suction catheter.
Remove the glove from the nondominant hand and dispose of gloves, catheter, and the container with solution in the appropriate receptacle.
Order was obtained to suction via the nasopharyngeal route.
endobj Facebook Twitter Youtube Instagram LinkedIn. x\_WDhl
Follow agency policy regarding setting suction pressure. 2 0 obj AARC clinical practice guideline: Nasotracheal suctioning - 2004 revision & update. %%EOF e5n%L#Bx)NDF>{ ck?rBLX9y)dZz|j,}y./[p={}_~V7LC-p3p*e\Ejha
(2010).
'o28ah{q^2IT% j1FiPPY AEY.Ujddp,>{BQ&m&,~&tm d2c0E,6i^ 2 0 obj 273 0 obj <>stream During suctioning, a small catheter or tube is inserted into the breathing tube. Ensure the patients privacy and dignity.
A small rubber tube called a "nasal trumpet" may be left inside one side of the nose to make it easier to slide the suction catheter into the airway and to reduce the irritation caused by inserting the catheter. After first pass of suctioning, patient began coughing uncontrollably.
For oropharyngeal suctioning, insert the catheter through the mouth, along the side of the mouth toward the trachea. Patient complaining of not being able to cough up secretions. x\[o~G{QDR"@^6dI8(p\k)3h"S'd#gm}3)[vRUm:I[gW-\z;>aQ The following ranges are appropriate pressure according to the patients age: Use the checklist below to review the steps for completion of Oropharyngeal or Nasopharyngeal Suctioning.. endobj Report any concerns according to agency policy. endobj %PDF-1.7 % Procedure was stopped and emergency assistance was requested from the respiratory therapist.
In many agencies, Yankauer suctioning can be delegated to trained assistive personnel if the patient is stable, but the nurse is responsible for assessing and documenting the patients respiratory status. q 210 0 obj <> endobj Suction of secretions through the mouth, often using a Yankauer device.
Please seethe COVID-19 section of our website for up-to-date information. With the dominant gloved hand, pick up the sterile suction catheter. for an image of a Yankauer device. Coarse rhonchi present over anterior upper airway. <> Disclaimer: Always review and follow agency policy regarding this specific skill. R (*MDKE'?ua* 7B0xNE_0Cxx~/~,GKnnYEb8T|(2:P.J'KmEVY:Q1M.0c3TD(%YU. The catheter is connected to the breathing tube and contained within a sterile plastic bag. ?[(NLDH|m?n,g>l4')XY'xyHJGdt?-\=/__{ot~Jw !#1,?1/E,#Ut')!`AZS? Withdrawal or Withholding of Life Support. Suctioning is uncomfortable but it only lasts a few seconds. Wrap the suction catheter around your dominant hand between attempts: Repeat the procedure up to three times until gurgling or bubbling sounds stop and respirations are quiet. The amount of suction is set to an appropriate pressure according to the patients age. Lung sounds clear and no cyanosis present. Rigid device used to suction secretions from the mouth.
<>/XObject<>/ExtGState<>/ProcSet[/PDF/Text/ImageB/ImageC/ImageI] >>/MediaBox[ 0 0 612 792] /Contents 4 0 R/Group<>/Tabs/S/StructParents 0>> Replace the oxygen delivery device using your nondominant hand, if appropriate, and have the patient take several deep breaths. Turn off the suction. k2zl97TB8rmM4gi\.
Often, the patient will cough during the procedure. terile gloves for suctioning with sterile suction catheter, t, https://www.aarc.org/wp-content/uploads/2014/08/09.04.1080.pdf, https://opentextbc.ca/clinicalskills/chapter/5-7-oral-suctioning/, http://www.rcjournal.com/cpgs/pdf/06.10.0758.pdf, Next: 22.5 Checklist for Tracheostomy Suctioning and Sample Documentation, Creative Commons Attribution 4.0 International License, Chest auscultation of coarse, gurgling breath sounds, rhonchi, or diminished breath sounds, Reported feeling of secretions in the chest, Suspected aspiration of gastric or upper airway secretions, Clinically apparent increased work of breathing, Gather supplies: Yankauer or suction catheter, suction machine or wall suction device, suction canister, connecting tubing, pulse oximeter, stethoscope, PPE (e.g., mask, goggles or face shield, nonsterile gloves), s. Check the room for transmission-based precautions.
Advance the catheter approximately 5 to 6 inches to reach the pharynx. Need for suctioning is evidenced by one or more of the following: In emergent situations, a provider order is not necessary for suctioning to maintain a patients airway. Coarse rhonchi continued to be present over anterior upper airway but no cyanosis present. endobj endobj Apply suction by intermittently occluding the suction valve on the catheter with the thumb of your nondominant hand and continuously rotate the catheter as it is being withdrawn. Remove the oxygen delivery device, if appropriate. Q?%LpH ]A'w The suction (or vacuum) is applied to the catheter as the tube is removed.
(+PF4y1i2Z =( <> Apply lubricant to the first 2 to 3 inches of the catheter, using the lubricant that was placed on the sterile field. Do not apply suction as the catheter is inserted.
Advance the catheter 3 to 4 inches to reach the pharynx.
9 0 obj Reassess the patients respiratory status, including respiratory rate, effort, oxygen saturation, and lung sounds. In the home setting and other community-based settings, maintenance of sterility is not necessary. Dr. Smith notified and a STAT order was received for a chest X-ray and to call with results.
The patient may feel like his or her breath is being taken away. for an image of a sterile suction catheter. 4 0 obj Document the procedure and related assessment findings. Raise the bed rail and place the bed in the lowest position. When suctioning is completed, remove gloves from the dominant hand over the coiled catheter, pulling them off inside out. 17 0 obj How will children respond to critical illness? However, routine suctioning does require a provider order. endobj No cyanosis present. stream endobj
<> After the tube has been cleaned out, the patient will usually find it easier to breathe.
endobj Adjust the suction to the appropriate pressure: Adults and adolescents: no more than 150 mm Hg. endstream If unconscious, place the patient in the lateral position, facing you.
(2020). Patient tolerated procedure without difficulties.
2.8 Functional Health and Activities of Daily Living, 2.11 Checklist for Obtaining a Health History, Chapter Resources A: Sample Health History Form, 3.6 Supplementary Video of Blood Pressure Assessment, 4.5 Checklist for Hand Hygiene with Soap and Water, 4.6 Checklist for Hand Hygiene with Alcohol-Based Hand Sanitizer, 4.7 Checklist for Personal Protective Equipment (PPE), 4.8 Checklist for Applying and Removing Sterile Gloves, 6.12 Checklist for Neurological Assessment, 7.1 Head and Neck Assessment Introduction, 7.3 Common Conditions of the Head and Neck, 7.6 Checklist for Head and Neck Assessment, 7.7 Supplementary Video on Head and Neck Assessment, 8.6 Supplementary Video on Eye Assessment, 9.1 Cardiovascular Assessment Introduction, 9.5 Checklist for Cardiovascular Assessment, 9.6 Supplementary Videos on Cardiovascular Assessment, 10.5 Checklist for Respiratory Assessment, 10.6 Supplementary Videos on Respiratory Assessment, 11.4 Nursing Process Related to Oxygen Therapy, 11.7 Supplementary Videos on Oxygen Therapy, 12.3 Gastrointestinal and Genitourinary Assessment, 12.6 Supplementary Video on Abdominal Assessment, 13.1 Musculoskeletal Assessment Introduction, 13.6 Checklist for Musculoskeletal Assessment, 14.1 Integumentary Assessment Introduction, 14.6 Checklist for Integumentary Assessment, 15.1 Administration of Enteral Medications Introduction, 15.2 Basic Concepts of Administering Medications, 15.3 Assessments Related to Medication Administration, 15.4 Checklist for Oral Medication Administration, 15.5 Checklist for Rectal Medication Administration, 15.6 Checklist for Enteral Tube Medication Administration, 16.1 Administration of Medications Via Other Routes Introduction, 16.3 Checklist for Transdermal, Eye, Ear, Inhalation, and Vaginal Routes Medication Administration, 17.1 Enteral Tube Management Introduction, 17.3 Assessments Related to Enteral Tubes, 17.5 Checklist for NG Tube Enteral Feeding By Gravity with Irrigation, 18.1 Administration of Parenteral Medications Introduction, 18.3 Evidence-Based Practices for Injections, 18.4 Administering Intradermal Medications, 18.5 Administering Subcutaneous Medications, 18.6 Administering Intramuscular Medications, 18.8 Checklists for Parenteral Medication Administration, 19.8 Checklist for Blood Glucose Monitoring, 19.9 Checklist for Obtaining a Nasal Swab, 19.10 Checklist for Oropharyngeal Testing, 20.8 Checklist for Simple Dressing Change, 20.10 Checklist for Intermittent Suture Removal, 20.12 Checklist for Wound Cleansing, Irrigation, and Packing, 21.1 Facilitation of Elimination Introduction, 21.4 Inserting and Managing Indwelling Urinary Catheters, 21.5 Obtaining Urine Specimen for Culture, 21.6 Removing an Indwelling Urinary Catheter, 21.8 Applying the Nursing Process to Catheterization, 21.10 Checklist for Foley Catheter Insertion (Male), 21.11 Checklist for Foley Catheter Insertion (Female), 21.12 Checklist for Obtaining a Urine Specimen from a Foley Catheter, 21.14 Checklist for Straight Catheterization Female/Male, 21.15 Checklist for Ostomy Appliance Change, 22.1 Tracheostomy Care & Suctioning Introduction, 22.2 Basic Concepts Related to Suctioning, 22.3 Assessments Related to Airway Suctioning, 22.4 Oropharyngeal and Nasopharyngeal Suctioning Checklist & Sample Documentation, 22.5 Checklist for Tracheostomy Suctioning and Sample Documentation, 22.6 Checklist for Tracheostomy Care and Sample Documentation, 23.5 Checklist for Primary IV Solution Administration, 23.6 Checklist for Secondary IV Solution Administration, 23.9 Supplementary Videos Related to IV Therapy, Chapter 15 (Administration of Enteral Medications), Chapter 16 (Administration of Medications via Other Routes), Chapter 18 (Administration of Parenteral Medications), Chapter 22 (Tracheostomy Care & Suctioning), Appendix A - Hand Hygiene and Vital Signs Checklists, Appendix C - Head-to-Toe Assessment Checklist. AARC clinical practice guideline: Endotracheal suctioning of mechanically ventilated patients with artificial airways 2010. <> Adjust the bed to a comfortable working height and lower the side rail closest to you.
5 0 obj Vital signs obtained prior to procedure were heart rate 88 in regular rhythm, respiratory rate 28/minute, and O2 sat 88% on room air. .X This actually helps to bring more of the secretions forward.
Pressure should not exceed 150 mm Hg because higher pressures have been shown to cause trauma, hypoxemia, and atelectasis.
Want to adapt books like this? See Figure 22.7[4]for an image of extension tubing attached to a suction canister that is connected to a wall suctioning source. endobj Put on a face shield or goggles and mask. 8Q!" HA
This type of suctioning is performed when oral suctioning with a Yankauer is ineffective. 253 0 obj <>/Filter/FlateDecode/ID[<5D0AAA4DFDED4046819C8F1E81199BD5><383BEDF5222082478156D2804EA514EF>]/Index[210 64]/Info 209 0 R/Length 173/Prev 930451/Root 211 0 R/Size 274/Type/XRef/W[1 3 1]>>stream "wxN*F1Mu#fA.NRxyY}/M@ZXE-$dhXF-R\6,qDznqHU "5"J3"8Y=-"H+tmZ_|Ar9?[? Nursing Skills by Open Resources for Nursing (Open RN) is licensed under a Creative Commons Attribution 4.0 International License, except where otherwise noted. ,SVP'%9Sz[J:=K!
(NOTE: The open wrapper or container becomes a sterile field to hold other supplies.) Insert the catheter. <> 11 0 obj
Confirm patient ID using two patient identifiers (e.g., name and date of birth). <>
endobj Remove face shield or goggles and mask; perform hand hygiene.
3 0 obj
Procedure explained to the patient. Carefully remove the sterile container, touching only the outside surface.
document.write(new Date().getFullYear()), LHSC, London Ontario Canada, Advancing childrens neurosurgery through innovative technologies, LHSC announces research and innovation initiative, The scariest part is the uncertainty New therapeutic tool proven effective for MS patients with mental health challenges, Addressing Islamophobia: Honouring Our London Family, Head & Neck Above Cancer is back August 21, Registration is open for the Multiple Myeloma Walk of Champions happening on September 11, Procedure Arterial Line Insertion, Maintenance and Dressing Change. Post-procedure vital signs were heart rate 78 in regular rhythm, respiratory rate 18/minute, and O2 sat 94% on room air.
<> {R5hf33Px~A,y+^gTge
endobj Remove the supplemental oxygen placed for suctioning, if appropriate. Open the sterile suction package using aseptic technique. 16 0 obj 14 0 obj 1 0 obj Place a small amount of water-soluble lubricant on the sterile field, taking care to avoid touching the sterile field with the lubricant package. %
for an image of extension tubing attached to a suction canister that is connected to a wall suctioning source. Oronasopharyngeal suctioning.
Order was obtained to suction via the nasopharyngeal route. Learn more about how Pressbooks supports open practices.
/Image17 Do Q % Vital signs obtained prior to procedure were heart rate 88 in regular rhythm, respiratory rate 28/minute, and O2 sat 88% on room air.
Ensure safety measures when leaving the room: BED: Low and locked (in lowest position and brakes on), ROOM: Risk-free for falls (scan room and clear any obstacles). &_kjpD2ZP U&I_c31j$Z62vD&8GN \"Z^r_W gp)[wxnYT vT].aOr#WcwrL*L((C$:5 f6yIn[` "orz69y+zlVrOhX4qQ:d?jFn=W@3F~"CIj#2 rFW%@U_nxW_75d-?X8PFcFj>Be!)aE7u$Sd3(V!OBwY stream See Figure 22.6[3]for an image of a sterile suction catheter. Suctioning via the oropharyngeal (mouth) and nasopharyngeal (nasal) routes is performed to remove accumulated saliva, pulmonary secretions, blood, vomitus, and other foreign material from these areas that cannot be removed by the patients spontaneous cough or other less invasive procedures. Place a towel or waterproof pad across the patients chest. 1 0 obj This allows us to quickly suction a patient, without interrupting the breathing machine. Use appropriate listening and questioning skills. Moisten the catheter by dipping it into the container of sterile saline.
Post-procedure vital signs were heart rate 78 in regular rhythm, respiratory rate 18/minute, and O2 sat 94% on room air. endstream endobj startxref Coarse rhonchi present over anterior upper airway. Flush the catheter with saline.
Hold the catheter between your thumb and forefinger. Assist the patient to a comfortable position. Place the connecting tubing in a convenient location (e.g., at the head of the bed). See Figure 22.5[2]for an image of a Yankauer device. Assist the patient to a comfortable position, ask if they have any questions, and thank them for their time. Extension tubing is used to attach the Yankauer or suction catheter device to a suction canister that is attached to wall suction or a portable suction source. Nasal and pharyngeal suctioning are performed in a wide variety of settings, including critical care units, emergency departments, inpatient acute care, skilled nursing facility care, home care, and outpatient/ambulatory care. <> The dominant hand will manipulate the catheter and must remain sterile. hbbd```b``S@$)d A$4X d6lB49 "9A$1fgH@.l#e"SbwkAN{mal8- Increase the patients supplemental oxygen level or apply supplemental oxygen per facility policy or primary care provider order.
It may take the patient a few minutes to settle after suctioning. endobj <> American Association for Respiratory Care.
endobj In many agencies, Yankauer suctioning can be delegated to trained assistive personnel if the patient is stable, but the nurse is responsible for assessing and documenting the patients respiratory status. stream 12 0 obj endobj Put on a clean glove and occlude the end of the connection tubing to check suction pressure. hb```e`` ,@9Oo?KO V%@ZV(+,a`K`` 0u@R5X, 8?BMG1\v{OvZF-FOYa}"@+ex. Roll the catheter between your fingers to help advance it. <>
?CU 6 0 obj If a patient has a lot of secretions and cannot cough them forward, we may need to suction the secretions by inserting a suction catheter into the nose or mouth. %PDF-1.5
Where can I get help for myself or my family. endobj American Association for Respiratory Care. The nondominant hand is considered clean rather than sterile and will control the suction valve on the catheter. Introduce yourself, your role, the purpose of your visit, and an estimate of the time it will take. The procedure may make the patient cough and turn red in the face. stream 8 0 obj
endobj 15 0 obj
%PDF-1.5 Encourage the patient to take several deep breaths. 'uG6mT+3SV&edHN^"h~q?]%^ao55Zx }mK[d%^ajQE(TVT~>xfZ`@]Yx^xwc5y{6LSbVMM~$ . Allow 30 seconds to 1 minute between passes to allow reoxygenation and reventilation.
Perform oral hygiene on the patient after suctioning. {aJlA=)M/M2#B>f vu5h'Bf"KH !3)`_6Hx:1+BG]DD4"#PT!,cfya[S3B!~_3i4c|]QgW429JnL/tv)(1$*IWv;ZZy8MJe3n,$C 7 sqK],@ME#cR< M#C03F4U2y3}ZjBEhAF%AcaDFF'5:sg&2Mn5,Yt(h'bEI3WD``1=+#AjCsPxVxF@2=# Px8 .1NK}&.P#6tlf&Ayu97rs&3m8Q{o>F&[9ja@p}8?+]s S}P{a*Tw_W$R7 0-~@9,@$i>ENgJ@R ! <> endobj For oropharyngeal suctioning, a device called a Yankauer suction tip is typically used for suctioning mouth secretions.
Lippincott procedures. Don sterile gloves. endstream
Nasopharyngeal suctioning removes secretions from the nasal cavity, pharynx, and throat by inserting a flexible, soft suction catheter through the nares. Move the bedside table close to your work area and raise it to waist height.
Hy]Ei ]/xvX4fR*#)%*8Vj:u|TJ-wPIQ~
<>/ExtGState<>/ProcSet[/PDF/Text/ImageB/ImageC/ImageI] >>/MediaBox[ 0 0 612 792] /Contents 4 0 R/Group<>/Tabs/S/StructParents 0>> Set it up on the work surface and fill with sterile saline using sterile technique. 3 0 obj
:}P.XT5aWbo^?_#lif'$w"ICKH&"{CV>OKheF.%86? The ventilator will often alarm during suctioning. -@a(&9BKbb{+?Dr {y$>!MV3=wm,$j!TH!b. d1AGCd2X.p)LV884}LuiE 0_wc2js'S8 RT)uxSL`B$*+:b:>&2Ne@"q5=&- 29,IPg>ERS Nsek@@P'g"tR9~1;eks[DJo#AL}_}>}I>L&X2x?i6iGoS,cHa U1ciPz^2j^7{ Ol=9f"B;D 6xp"V*2e \_rg)Hwg:?;w7> 4 0 obj For nasopharyngeal suctioning, gently insert the catheter through the naris and along the floor of the nostril toward the trachea. <>>>/BBox[ 0 0 149.67 74.835] /Matrix[ 0.48106 0 0 0.96212 0 0] /Length 49>> <> Occlude the suction valve on the catheter to check for suction.
How do I prevent the spread of infection? endobj
<>
10 0 obj
150.8 0 0 75.993 0 -1.1585 cm
endobj
Don additional PPE. 0
Suction only on withdrawal and do not suction for more than 10 to 15 seconds at a time to minimize tissue trauma. A Yankauer device is rigid and has several holes for suctioning secretions that are commonly thick and difficult for the patient to clear. 7 0 obj
Ba?-_\w!6aFr?y_ xjk4'JF_F{Za4cb =oe4=_6p[=NB)yCD#(B43(~l}Id bkGq*6i"56n_|}zYwLV|FJ0 ve$5ATFr`x40;O#Rozv+65tX. 13 0 obj (2004). <>
<> If conscious, place the patient in a semi-Fowlers position. <>>> <>>> No cyanosis present. Assess the effectiveness of suctioning by listening to lung sounds and repeat, as needed, and according to the patients tolerance. <>
Suctioning is indicated when the patient is unable to clear secretions and/or when there is audible or visible evidence of secretions in the large/central airways that persist in spite of the patients best cough effort. Suctioning is sometimes done when the patient does not have a breathing tube. A small amount of clear, white, thick sputum was obtained. We may need to give the patient a medication to relax their breathing.
xZn7}7S[A\E>}X-@R[ywmP;rHiGX6C}a%y y}u~)S8SU:r[B,]i
Patient complaining of not being able to cough up secretions.
Pick up the connecting tubing with the nondominant hand and connect the tubing and suction catheter.
Remove the glove from the nondominant hand and dispose of gloves, catheter, and the container with solution in the appropriate receptacle.
Order was obtained to suction via the nasopharyngeal route.
endobj Facebook Twitter Youtube Instagram LinkedIn. x\_WDhl
Follow agency policy regarding setting suction pressure. 2 0 obj AARC clinical practice guideline: Nasotracheal suctioning - 2004 revision & update. %%EOF e5n%L#Bx)NDF>{ ck?rBLX9y)dZz|j,}y./[p={}_~V7LC-p3p*e\Ejha
(2010).
'o28ah{q^2IT% j1FiPPY AEY.Ujddp,>{BQ&m&,~&tm d2c0E,6i^ 2 0 obj 273 0 obj <>stream During suctioning, a small catheter or tube is inserted into the breathing tube. Ensure the patients privacy and dignity.
A small rubber tube called a "nasal trumpet" may be left inside one side of the nose to make it easier to slide the suction catheter into the airway and to reduce the irritation caused by inserting the catheter. After first pass of suctioning, patient began coughing uncontrollably.
For oropharyngeal suctioning, insert the catheter through the mouth, along the side of the mouth toward the trachea. Patient complaining of not being able to cough up secretions. x\[o~G{QDR"@^6dI8(p\k)3h"S'd#gm}3)[vRUm:I[gW-\z;>aQ The following ranges are appropriate pressure according to the patients age: Use the checklist below to review the steps for completion of Oropharyngeal or Nasopharyngeal Suctioning.. endobj Report any concerns according to agency policy. endobj %PDF-1.7 % Procedure was stopped and emergency assistance was requested from the respiratory therapist.
In many agencies, Yankauer suctioning can be delegated to trained assistive personnel if the patient is stable, but the nurse is responsible for assessing and documenting the patients respiratory status. q 210 0 obj <> endobj Suction of secretions through the mouth, often using a Yankauer device.
Please seethe COVID-19 section of our website for up-to-date information. With the dominant gloved hand, pick up the sterile suction catheter. for an image of a Yankauer device. Coarse rhonchi present over anterior upper airway. <> Disclaimer: Always review and follow agency policy regarding this specific skill. R (*MDKE'?ua* 7B0xNE_0Cxx~/~,GKnnYEb8T|(2:P.J'KmEVY:Q1M.0c3TD(%YU. The catheter is connected to the breathing tube and contained within a sterile plastic bag. ?[(NLDH|m?n,g>l4')XY'xyHJGdt?-\=/__{ot~Jw !#1,?1/E,#Ut')!`AZS? Withdrawal or Withholding of Life Support. Suctioning is uncomfortable but it only lasts a few seconds. Wrap the suction catheter around your dominant hand between attempts: Repeat the procedure up to three times until gurgling or bubbling sounds stop and respirations are quiet. The amount of suction is set to an appropriate pressure according to the patients age. Lung sounds clear and no cyanosis present. Rigid device used to suction secretions from the mouth.
<>/XObject<>/ExtGState<>/ProcSet[/PDF/Text/ImageB/ImageC/ImageI] >>/MediaBox[ 0 0 612 792] /Contents 4 0 R/Group<>/Tabs/S/StructParents 0>> Replace the oxygen delivery device using your nondominant hand, if appropriate, and have the patient take several deep breaths. Turn off the suction. k2zl97TB8rmM4gi\.
Often, the patient will cough during the procedure. terile gloves for suctioning with sterile suction catheter, t, https://www.aarc.org/wp-content/uploads/2014/08/09.04.1080.pdf, https://opentextbc.ca/clinicalskills/chapter/5-7-oral-suctioning/, http://www.rcjournal.com/cpgs/pdf/06.10.0758.pdf, Next: 22.5 Checklist for Tracheostomy Suctioning and Sample Documentation, Creative Commons Attribution 4.0 International License, Chest auscultation of coarse, gurgling breath sounds, rhonchi, or diminished breath sounds, Reported feeling of secretions in the chest, Suspected aspiration of gastric or upper airway secretions, Clinically apparent increased work of breathing, Gather supplies: Yankauer or suction catheter, suction machine or wall suction device, suction canister, connecting tubing, pulse oximeter, stethoscope, PPE (e.g., mask, goggles or face shield, nonsterile gloves), s. Check the room for transmission-based precautions.
Advance the catheter approximately 5 to 6 inches to reach the pharynx. Need for suctioning is evidenced by one or more of the following: In emergent situations, a provider order is not necessary for suctioning to maintain a patients airway. Coarse rhonchi continued to be present over anterior upper airway but no cyanosis present. endobj endobj Apply suction by intermittently occluding the suction valve on the catheter with the thumb of your nondominant hand and continuously rotate the catheter as it is being withdrawn. Remove the oxygen delivery device, if appropriate. Q?%LpH ]A'w The suction (or vacuum) is applied to the catheter as the tube is removed.
(+PF4y1i2Z =( <> Apply lubricant to the first 2 to 3 inches of the catheter, using the lubricant that was placed on the sterile field. Do not apply suction as the catheter is inserted.
Advance the catheter 3 to 4 inches to reach the pharynx.
9 0 obj Reassess the patients respiratory status, including respiratory rate, effort, oxygen saturation, and lung sounds. In the home setting and other community-based settings, maintenance of sterility is not necessary. Dr. Smith notified and a STAT order was received for a chest X-ray and to call with results.
The patient may feel like his or her breath is being taken away. for an image of a sterile suction catheter. 4 0 obj Document the procedure and related assessment findings. Raise the bed rail and place the bed in the lowest position. When suctioning is completed, remove gloves from the dominant hand over the coiled catheter, pulling them off inside out. 17 0 obj How will children respond to critical illness? However, routine suctioning does require a provider order. endobj No cyanosis present. stream endobj
<> After the tube has been cleaned out, the patient will usually find it easier to breathe.
endobj Adjust the suction to the appropriate pressure: Adults and adolescents: no more than 150 mm Hg. endstream If unconscious, place the patient in the lateral position, facing you.
(2020). Patient tolerated procedure without difficulties.
2.8 Functional Health and Activities of Daily Living, 2.11 Checklist for Obtaining a Health History, Chapter Resources A: Sample Health History Form, 3.6 Supplementary Video of Blood Pressure Assessment, 4.5 Checklist for Hand Hygiene with Soap and Water, 4.6 Checklist for Hand Hygiene with Alcohol-Based Hand Sanitizer, 4.7 Checklist for Personal Protective Equipment (PPE), 4.8 Checklist for Applying and Removing Sterile Gloves, 6.12 Checklist for Neurological Assessment, 7.1 Head and Neck Assessment Introduction, 7.3 Common Conditions of the Head and Neck, 7.6 Checklist for Head and Neck Assessment, 7.7 Supplementary Video on Head and Neck Assessment, 8.6 Supplementary Video on Eye Assessment, 9.1 Cardiovascular Assessment Introduction, 9.5 Checklist for Cardiovascular Assessment, 9.6 Supplementary Videos on Cardiovascular Assessment, 10.5 Checklist for Respiratory Assessment, 10.6 Supplementary Videos on Respiratory Assessment, 11.4 Nursing Process Related to Oxygen Therapy, 11.7 Supplementary Videos on Oxygen Therapy, 12.3 Gastrointestinal and Genitourinary Assessment, 12.6 Supplementary Video on Abdominal Assessment, 13.1 Musculoskeletal Assessment Introduction, 13.6 Checklist for Musculoskeletal Assessment, 14.1 Integumentary Assessment Introduction, 14.6 Checklist for Integumentary Assessment, 15.1 Administration of Enteral Medications Introduction, 15.2 Basic Concepts of Administering Medications, 15.3 Assessments Related to Medication Administration, 15.4 Checklist for Oral Medication Administration, 15.5 Checklist for Rectal Medication Administration, 15.6 Checklist for Enteral Tube Medication Administration, 16.1 Administration of Medications Via Other Routes Introduction, 16.3 Checklist for Transdermal, Eye, Ear, Inhalation, and Vaginal Routes Medication Administration, 17.1 Enteral Tube Management Introduction, 17.3 Assessments Related to Enteral Tubes, 17.5 Checklist for NG Tube Enteral Feeding By Gravity with Irrigation, 18.1 Administration of Parenteral Medications Introduction, 18.3 Evidence-Based Practices for Injections, 18.4 Administering Intradermal Medications, 18.5 Administering Subcutaneous Medications, 18.6 Administering Intramuscular Medications, 18.8 Checklists for Parenteral Medication Administration, 19.8 Checklist for Blood Glucose Monitoring, 19.9 Checklist for Obtaining a Nasal Swab, 19.10 Checklist for Oropharyngeal Testing, 20.8 Checklist for Simple Dressing Change, 20.10 Checklist for Intermittent Suture Removal, 20.12 Checklist for Wound Cleansing, Irrigation, and Packing, 21.1 Facilitation of Elimination Introduction, 21.4 Inserting and Managing Indwelling Urinary Catheters, 21.5 Obtaining Urine Specimen for Culture, 21.6 Removing an Indwelling Urinary Catheter, 21.8 Applying the Nursing Process to Catheterization, 21.10 Checklist for Foley Catheter Insertion (Male), 21.11 Checklist for Foley Catheter Insertion (Female), 21.12 Checklist for Obtaining a Urine Specimen from a Foley Catheter, 21.14 Checklist for Straight Catheterization Female/Male, 21.15 Checklist for Ostomy Appliance Change, 22.1 Tracheostomy Care & Suctioning Introduction, 22.2 Basic Concepts Related to Suctioning, 22.3 Assessments Related to Airway Suctioning, 22.4 Oropharyngeal and Nasopharyngeal Suctioning Checklist & Sample Documentation, 22.5 Checklist for Tracheostomy Suctioning and Sample Documentation, 22.6 Checklist for Tracheostomy Care and Sample Documentation, 23.5 Checklist for Primary IV Solution Administration, 23.6 Checklist for Secondary IV Solution Administration, 23.9 Supplementary Videos Related to IV Therapy, Chapter 15 (Administration of Enteral Medications), Chapter 16 (Administration of Medications via Other Routes), Chapter 18 (Administration of Parenteral Medications), Chapter 22 (Tracheostomy Care & Suctioning), Appendix A - Hand Hygiene and Vital Signs Checklists, Appendix C - Head-to-Toe Assessment Checklist. AARC clinical practice guideline: Endotracheal suctioning of mechanically ventilated patients with artificial airways 2010. <> Adjust the bed to a comfortable working height and lower the side rail closest to you.
5 0 obj Vital signs obtained prior to procedure were heart rate 88 in regular rhythm, respiratory rate 28/minute, and O2 sat 88% on room air. .X This actually helps to bring more of the secretions forward.
Pressure should not exceed 150 mm Hg because higher pressures have been shown to cause trauma, hypoxemia, and atelectasis.
Want to adapt books like this? See Figure 22.7[4]for an image of extension tubing attached to a suction canister that is connected to a wall suctioning source. endobj Put on a face shield or goggles and mask. 8Q!" HA
This type of suctioning is performed when oral suctioning with a Yankauer is ineffective. 253 0 obj <>/Filter/FlateDecode/ID[<5D0AAA4DFDED4046819C8F1E81199BD5><383BEDF5222082478156D2804EA514EF>]/Index[210 64]/Info 209 0 R/Length 173/Prev 930451/Root 211 0 R/Size 274/Type/XRef/W[1 3 1]>>stream "wxN*F1Mu#fA.NRxyY}/M@ZXE-$dhXF-R\6,qDznqHU "5"J3"8Y=-"H+tmZ_|Ar9?[? Nursing Skills by Open Resources for Nursing (Open RN) is licensed under a Creative Commons Attribution 4.0 International License, except where otherwise noted. ,SVP'%9Sz[J:=K!
(NOTE: The open wrapper or container becomes a sterile field to hold other supplies.) Insert the catheter. <> 11 0 obj
Confirm patient ID using two patient identifiers (e.g., name and date of birth). <>
endobj Remove face shield or goggles and mask; perform hand hygiene.
3 0 obj
Procedure explained to the patient. Carefully remove the sterile container, touching only the outside surface.
document.write(new Date().getFullYear()), LHSC, London Ontario Canada, Advancing childrens neurosurgery through innovative technologies, LHSC announces research and innovation initiative, The scariest part is the uncertainty New therapeutic tool proven effective for MS patients with mental health challenges, Addressing Islamophobia: Honouring Our London Family, Head & Neck Above Cancer is back August 21, Registration is open for the Multiple Myeloma Walk of Champions happening on September 11, Procedure Arterial Line Insertion, Maintenance and Dressing Change. Post-procedure vital signs were heart rate 78 in regular rhythm, respiratory rate 18/minute, and O2 sat 94% on room air.
<> {R5hf33Px~A,y+^gTge
endobj Remove the supplemental oxygen placed for suctioning, if appropriate. Open the sterile suction package using aseptic technique. 16 0 obj 14 0 obj 1 0 obj Place a small amount of water-soluble lubricant on the sterile field, taking care to avoid touching the sterile field with the lubricant package. %
for an image of extension tubing attached to a suction canister that is connected to a wall suctioning source. Oronasopharyngeal suctioning.
Order was obtained to suction via the nasopharyngeal route. Learn more about how Pressbooks supports open practices.
/Image17 Do Q % Vital signs obtained prior to procedure were heart rate 88 in regular rhythm, respiratory rate 28/minute, and O2 sat 88% on room air.
Ensure safety measures when leaving the room: BED: Low and locked (in lowest position and brakes on), ROOM: Risk-free for falls (scan room and clear any obstacles). &_kjpD2ZP U&I_c31j$Z62vD&8GN \"Z^r_W gp)[wxnYT vT].aOr#WcwrL*L((C$:5 f6yIn[` "orz69y+zlVrOhX4qQ:d?jFn=W@3F~"CIj#2 rFW%@U_nxW_75d-?X8PFcFj>Be!)aE7u$Sd3(V!OBwY stream See Figure 22.6[3]for an image of a sterile suction catheter. Suctioning via the oropharyngeal (mouth) and nasopharyngeal (nasal) routes is performed to remove accumulated saliva, pulmonary secretions, blood, vomitus, and other foreign material from these areas that cannot be removed by the patients spontaneous cough or other less invasive procedures. Place a towel or waterproof pad across the patients chest. 1 0 obj This allows us to quickly suction a patient, without interrupting the breathing machine. Use appropriate listening and questioning skills. Moisten the catheter by dipping it into the container of sterile saline.
Post-procedure vital signs were heart rate 78 in regular rhythm, respiratory rate 18/minute, and O2 sat 94% on room air. endstream endobj startxref Coarse rhonchi present over anterior upper airway. Flush the catheter with saline.
Hold the catheter between your thumb and forefinger. Assist the patient to a comfortable position. Place the connecting tubing in a convenient location (e.g., at the head of the bed). See Figure 22.5[2]for an image of a Yankauer device. Assist the patient to a comfortable position, ask if they have any questions, and thank them for their time. Extension tubing is used to attach the Yankauer or suction catheter device to a suction canister that is attached to wall suction or a portable suction source. Nasal and pharyngeal suctioning are performed in a wide variety of settings, including critical care units, emergency departments, inpatient acute care, skilled nursing facility care, home care, and outpatient/ambulatory care. <> The dominant hand will manipulate the catheter and must remain sterile. hbbd```b``S@$)d A$4X d6lB49 "9A$1fgH@.l#e"SbwkAN{mal8- Increase the patients supplemental oxygen level or apply supplemental oxygen per facility policy or primary care provider order.
It may take the patient a few minutes to settle after suctioning. endobj <> American Association for Respiratory Care.
endobj In many agencies, Yankauer suctioning can be delegated to trained assistive personnel if the patient is stable, but the nurse is responsible for assessing and documenting the patients respiratory status. stream 12 0 obj endobj Put on a clean glove and occlude the end of the connection tubing to check suction pressure. hb```e`` ,@9Oo?KO V%@ZV(+,a`K`` 0u@R5X, 8?BMG1\v{OvZF-FOYa}"@+ex. Roll the catheter between your fingers to help advance it. <>
?CU 6 0 obj If a patient has a lot of secretions and cannot cough them forward, we may need to suction the secretions by inserting a suction catheter into the nose or mouth. %PDF-1.5
Where can I get help for myself or my family. endobj American Association for Respiratory Care. The nondominant hand is considered clean rather than sterile and will control the suction valve on the catheter. Introduce yourself, your role, the purpose of your visit, and an estimate of the time it will take. The procedure may make the patient cough and turn red in the face. stream 8 0 obj
endobj 15 0 obj
%PDF-1.5 Encourage the patient to take several deep breaths. 'uG6mT+3SV&edHN^"h~q?]%^ao55Zx }mK[d%^ajQE(TVT~>xfZ`@]Yx^xwc5y{6LSbVMM~$ . Allow 30 seconds to 1 minute between passes to allow reoxygenation and reventilation.