 I can just map the pins from the mini to the UNO, right? The following script captures the data and sends it to Weather Underground. Using a single battery the device operates over a year. 1. lora robotshop mhz dragino 868mhz lorawan wasserdichter ip68 bastelgarage In the next example I will convert this into a Lora Gateway that is we will be sending the temperature and humidity values to the IoT platform and this way we will be able to monitor the temperature and humidity values from anywhere in the world. I would appreciate your support in this way! In order to program theSTM32 microcontroller boardusing theArduino IDE, first you will need toflash the bootloader, and you will also need to install theSTM32 board, and some drivers. As this project is based on the wireless communication so, we have two programs, one program is written for the Transmitter side and the other program is written for the Receiver side. Following the instructions in this article you will use the Semtech Network Server, which allows you develop and prototype with up to ten devices and three gateways. STM32, SX1278 Lora, and DHT11 Programming: DHT11 Temperature and Humidity Sensor with the STM32F103C, Arduino and Lora based getting started tutorial, Arduino Fingerprint Door Lock, Android biometric, Fingerprint app lock, Introduction to Casing Capping Wiring System, Android app development to control Arduino over Bluetooth using Android Studio, Soil NPK Sensor with Arduino and Android Cell Phone Application for monitoring Soil Nutrient, Arduino esp8266 wifi Home/Office Automation System, IOT based Car Parking System using Arduino and Nodemcu esp8266, How to Create Android App for Arduino Sensor Monitoring over Bluetooth, Arduino Oled i2c Display 128x64 with examples, Wiring, and Libraries issues solved, Electric Motor Tripping Reasons and How to fix them, Star Delta Motors, pH meter Arduino, pH Meter Calibration, DIYMORE pH Sensor Arduino Code, 500W Ebike Brushless Motor Controller wiring explanation, Hoverboard Test, Qualcomm Snapdragon 680 Complete review with benchmarks, Arduino DC Motor Speed Control with Encoder, Arduino DC Motor Encoder, Arduino CNC Shield V3.0 and A4988 Hybrid Stepper Motor Driver + Joystick, Arduino Libraries Download and Projects they are used in Project codes.
 https://github.com/CongducPham/LowCostLoRaGw#pcbs. Following are the components required for making this project.
 In theory an entire city could be covered by a just a handful of gateways and messages from devices belonging to any user could be detected anywhere in the city. First we call the function sensor_getValue() which we defined in my_demo_sensor_code.cpp to get the sensed value. LoRa, is an RF modulation technique which allows for extremely low powered wireless communication systems. Assemble the circuit as shown in the figure below.
The high sensitivity combined with the integrated +20dBm power amplifier yields industry leading link budget making it optimal for any application requiring range or robustness. transceiver temperature wireless consumption indicator arduino 915mhz sx1276 dragino lora rf module bee sensor ultra built range low battery power Its fairly simple to use, but requires careful timing to grab data. Share it with us! On the other hand you must connect a gateway with a LoRa module to a PC. This standard allows device built with LoRa chipsets to wirelessly connect to the internet and helps ensure compatibility of devices among manufacturers around the world.
using another program, you can use some tools to edit hexadecimal characters. For each frequency band, several frequencies/channels will be defined and a default frequency will be used. We modified it for our own purposes and added advanced functionalities. Where do you use the script you have posted in the HTTP integration of TTN? Hello, i want to ask.
The main program, i.e. The uplink is received by the LoRaWAN gateway. Check if there is LoRa Gateway of the The Things Network in your area!
 The VCC and GND pins of the SSD1306 Oled display module are connected with the Arduinos 3.3V and GND pins. Follow the instructions in this
Now, lets take a look at the programming. Question For better understanding, we will define some important basic parameters for the LoRa sensor to start with.
The VCC and GND pins of the SSD1306 Oled display module are connected with the Arduinos 3.3V and GND pins. Follow the instructions in this
Now, lets take a look at the programming. Question For better understanding, we will define some important basic parameters for the LoRa sensor to start with. The circuit diagram is given below.
 To place the weather station somewhere, I drew a case and printed it with the 3d printer. The data is read out and sent to Cayenne Mydevices and Weather Underground using LoRa and The Things Network. The WaziDev board is a 3.3V board.
 LoRa radio section. communication iotdesignpro sx1278 Here is the WaziNano board with the analog LM35DZ temperature sensor that will be used.
This structure is called "voltage divider". $pressure); Of course you can of course make your own variant. I looking for something like this: arduino pro mini + low power wifi module + sensors, 1. arduino sleep for 15 minutes 2. measure some values and send to thingspeak 3. sleep again. If you want to get started with the Altium designer, you can click on the get started. $temperature_1 = $data->payload_fields->temperature_1; side of the breadboard to provide access to the 5 volt supply and Note that the frequency band mostly depends on regulations defined for each country or region.
I have a spare UNO. Altium Designer enables engineers to effortlessly connect with every facet of the electronics design process. humidity 433mhz For now, lets just use to 868MHz band with the RFM95W which is based on the SX1276. ESP32 & LoRa SX1278/76 Transmitter Receiver with OLED: Check Here. It has an integrated 868MHz antenna which is realized in collaboration with Pr. It returns the number of bytes transmitted otherwise. When defining the correct LoRa chip model, the example template will include the corresponding header file: SX126X_RadioSettings.h or SX127X_RadioSettings.h or SX128X_RadioSettings.h. You do not need to worry much about most of the parameters and you can just for the moment leave them as they are defined by default. Communication is also possible in the other direction, where a message is sent as a downlink to the device. We are using a moisture sensor in this tutorial, but there are many potential uses for LoRa devices; alternative sensors for your device could include temperature, humidity, motion, air quality, light, accelerometers, and more. This module help me, thanks.
But basically all of them has same pinout as LoRa SX1278 is an SPI module. So, lets first start with the Transmitter side programming. All the components can easily be purchased from Amazon. We are however going to describe some of the parameters to better understand the configuration of the LoRa transmission.
The programming style of the Arduino and STM32 is almost the same. humidity sht30 th02 sensor file_put_contents('json/post'.time(). Type the following hexadecimal code to program the LoRa gateway with this specifications: For more information on how to make the packages needed for LoRa gateway communication read point 3 in This commit does not belong to any branch on this repository, and may belong to a fork outside of the repository. of the shield (Analog 0). Currently, I am running my own YouTube channel "Electronic Clinic", and managing this Website. The only real downside of this sensor is you can only get new data from it once every 2 seconds, so when using the library, sensor readings can be up to 2 seconds old. Now, lets take a look at the programming. Hi, Nice project. Since the frequencies used are orders of magnitude smaller than other common wireless communication methods, such as Wi-Fi, the range of transmission is much larger; up to 10 miles or more in rural areas with a clear line of sight.
You will need to copy the library into your sketch/libraries folder. Arduino_LoRa_Demo_Sensor is a very simple demo sketch for training purpose. So you can be sure that the sensors works. If you have the simple WaziNano board that has been integrated within the EU H2020 WAZIUP & WAZIHUB projects you can also use it. add/modify code in 220 Ohm resistor.Finally connect the other leg of the resistor to 5 volt. Now, lets take a look at the receiver side programming. Why my result when I uploaded to my node on serial monitor is "Enter do_send" and after that there isn't happening on my serial monitor. $tempf . Route it your way through any angle, tune for delay, Push, Slide, and Walkaround faster than ever. ESP32 LoRa Sensor Data Monitoring on Web Server: Check Here Cannot retrieve contributors at this time. '.json', file_get_contents('php://input')); The answer is pretty straightforward, if you have been using Arduino boards then you should know the Arduino boards hangs a lot in the long run and for me its quite difficult to go and manually reset the Arduino board, so I decided to use the STM32F103C which is very fast as compared to the Arduino boards, stm32 may also get stuck but not as frequently as the Arduino boards. I used Atom with PlatformIO to realize this project, so this is a PlatformIO project. If you are limited by time, budget, or hardware availability, it is possible to complete Stage 1 and then either: By the end of this tutorial you will know how to: For LoRa Developer Portal support or to report issues please use: [emailprotected], Building a LoRa-based Device End-to-End with Arduino, Sign Up for the LoRa Developer Portal Newsletter. https://github.com/adafruit/DHT-sensor-librar, LoraMAC-in-C for Arduino thank to Thomas Telkamp and Matthijs Kooijman (, CayenneLPP of The Things Network Arduino Library (https://github.com/TheThingsNetwork/arduino-device-lib), Adafruit DHT Humidity & Temperature Unified Sensor Library (, Low-Power: Lightweight low power library for Arduino (. Thank you very much! iot sht30 sensor humidity th02 lora Can someone help me please. So, before I am going to explain the Lora SX1278 interfacing with the STM32 and its programming; first lets practically see how this system works. It is important if you are working in several groups that each physical device has a different address. The LoRa SX1278 is not 5V friendly so do not supply 5V to it else the board will get damaged. You can see the temperature and Humidity values are comma separated, I used comma as the delimiter which will help me in splitting the values. The DHT11 is a basic, ultra low-cost digital temperature and humidity sensor. The LoRa communication library to drive the LoRa radio module is referred to as the SX12XX library. The transmission of the packet is realized with the LT.transmitAddressed() function that takes 8 parameters: the buffer message to be sent, the number of bytes to be sent, the packet type (here it is PKT_TYPE_DATA), the destination address (here it is DEFAULT_DEST_ADDR which is defined as 1 for the gateway), the source address, a timeout value (here it is set to 10000ms), the transmission power in dBm (here MAX_DBM is defined as 14dBm in SX127X_RadioSettings.h) and finally WAIT_TX which indicates that we will wait for the transmission to finish before we return from the LT.transmitAddressed() function. 2019 - Muhammad Ehsan, Mamour Diop & Congduc Pham, The raw source of the sketch example is visible, //change here how the temperature should be computed depending on your sensor type, //convert the floating value into a string, https://github.com/CongducPham/LowCostLoRaGw#pcbs, github:https://github.com/CongducPham/LowCostLoRaGw/tree/master/Arduino/libraries/SX12XX/src. Nice diy weather station. I would HIDE my little weather station somewhere in the park.
The receiver part contains Arduino Nano Board and LoRa SX1278 Module. I added a script to read the battery voltage today. Each header file will define some LoRa parameters needed to run the LoRa rado module. For this project I used the following hardware: It is wise to first test the sensors on a breadboard. The sketch starts by defining which LoRa chip family we are using.
The circuit diagram is given below. We will use DHT11 Humidity & Temperature Sensor & send the Temperature & Humidity value wirelessly from one Arduino to another using SX1278 Ra-02 LoRa Module. arduino lora iot required assembly education project hackster hub build connected projects mqtt publish solved subscribe feb jan viewed most Here we are using the 868MHz band. I put the PHP script on a private webserver, in TTN I added the http integration, so all the data is posted to the script on my private webserver.
here. There are different versions and types of SX1278 breakout board available in market. But we recommend to not go beyond 5 characters because these characters will be sent wirelessly so more characters means longer packets. The weather station contains a temperature sensor, air pressure sensor and humidity sensor.
So, thats all for now. After transmission, we remain idle for 1 minute. to 5 volt. This data is sent to a LoRa gateway. Now let us setup the Receiver part now. The e-commerce for worldwide community of developers, designers, inventors and makers who love creating electronics with sensors, robotics, Arduino and Raspberry Pi. github:https://github.com/CongducPham/LowCostLoRaGw/tree/master/Arduino/libraries/SX12XX/src. So coordinate with the other students to use a different address for each device. So, most of the time the receiver side will be OFF. You can clearly see the Temperature and Humidity values on the Oled display module. I was surmising that I would have to use a more expensive option, like a cellular breakout board and "call" my weather station to get the info.This seems much more doable.
The architecture of a LoRaWAN network is shown above. also chose appropriate voltage scale for the board, 3300.0 for 3.3V and 5000.0 for 5V. $data = json_decode($json); // take the data out of the json The data will be sent to the URL with a POST or a GET. The SCL and SDA pins of the Oled display module are connected with the B6 and B7 pins of the STM32. We start with defining the nomenclature string. $relative_humidity_3 = $data->payload_fields->relative_humidity_3; // tempc to tempf For this example, we will use PIN A0 to read the For communication between two LoRa Module, you need to have LoRa library. You normally do not have to change anything in the setup() function. I never know how to dress if I wish to go for a walk/hike there. Build a LoRa device to receive and log messages. So LoRa technology is introduced by Semtech to fix all these issue. Using esp and regulator it takes a little bit more time to connect everything correct. I started off by adding the library and defined some pins and variables. I've try the similar setup with the open IoT - www.i4things.com / https://github.com/i4things - with Heltec LoRa32 hardware, but the power consumption of the ESP32 is not small , switched to Feather 32u4 LoRa and now seems to be OK :), Question The network server receives the messages from the gateway and checks whether the device is registered on its network; the network server also carries out deduping, since the message may be received and uploaded by multiple gateways. 2. 433mhz lora arduino The message is then forwarded to the application server on which the device is registered. The gateway sends the message to the Semtech Network Server. This tutorial allows the user to measure the temperature and the light level in a room. my_demo_sensor_code.cpp to adapt the code for a given physical sensor. my_demo_sensor_code.cpp. The end devices transmit their payloads in what are known as an uplink messages, to be picked up by a LoRaWAN gateway. If you are using a digital sensor you probably dont need the scaling factor. "&humidity=" . I added this if incase you want to print the values on the Oled display module. Then add the sensors.
MISO pin is connected with PA6, MOSI pin is connected with PA7, SLCK pin is connected with PA5, and the NSS pin is connected with the PA4 pin of the STM32. The SCLK pin of the SX1278 LoRa module is connected with the Arduinos pin 13. Did you make this project? The address is a numeric value between 2 and 255 as address 1 is reserved for the gateway. github repository, especially at the section on $tempf = ($temperature_1 * 9/5) + 32; // pressure I have 5v Arduino Pro Mini boards already in my possession and am hesitant about investing into 3.3v/8mhz, would 5v be applicable with this project? Very cool!I would like to add some kind of wind-speed mechanism if there was one that did not spin around saying "hear I am, come vandalize me!" There are various options for network servers, described in this guide. my_demo_sensor_code.h and I have a very detailed tutorial on this and I highly recommend you should read thisarticle. Hello ! Register your own Personal Weather Station on https://www.wunderground.com/personal-weather-station/signup.
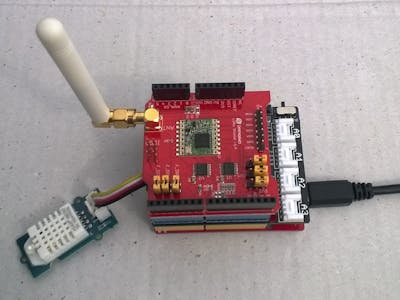
In this guide we will walk you through building your own LoRa-enabled device from end-to-end using an Arduino board and Dragino shield. We have to make two different setup, one as a transmitter and other as a receiver. If you want to use one of the sensors you saw in previous examples (for instance the photoresistor or the DHT22), you have to use appropriate copy/paste to adapt the code to the sensor you are using. dragino lorawan The PCBs is freely available (Gerber files for the PCB manufacturer) from our GitHub at As you can see, this is the same exact program from my previous tutorial, this time I added code for the Lora SX1278 module. On the receiver side, I didnt even change a single instruction. If you havent done it yet, you can download the .zip archive diagram. then we define the pin to power up the board. The SDA and SCL pins of the Oled display module are connected with the Arduinos I2C pins A4 and A5. WaziDev board developed by WAZIUP e.V. The downlink message is sent from the application server to the network server. There is also the In function sensor_getValue(), we define the way we read a value from the temperature sensor.